
How to Specify Necklines, Armholes and Straps for Custom Tank Tops
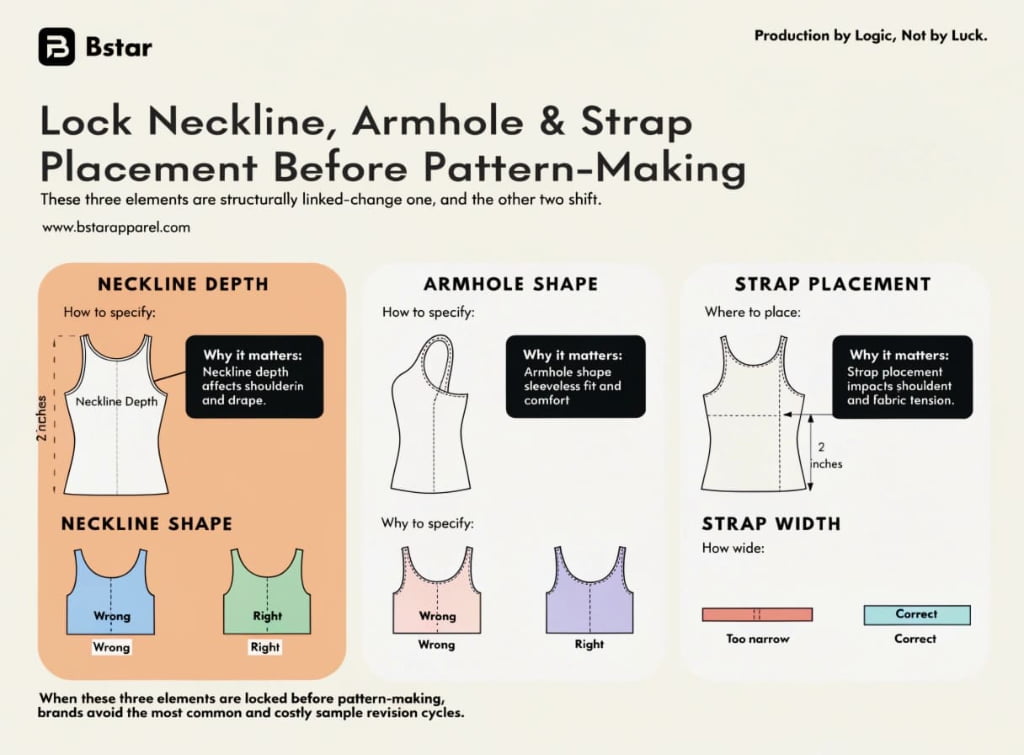
Many brands come to us with a Pinterest image and a vibe. That is a useful place to start. But when a custom tank top brief leaves neckline depth, armhole shape, and strap placement open, someone downstream has to interpret them. A different interpretation can cost rework time and money.
Custom tank top specifications should define neckline shape, front/back depth and width; armhole shape, depth and coverage; and strap width, length, placement and finish. Mark the measurement points on a sketch, identify the intended fabric, and agree what the first sample should confirm. Review these details together: some changes affect adjacent areas, but lowering a neckline does not automatically move the armholes or straps.
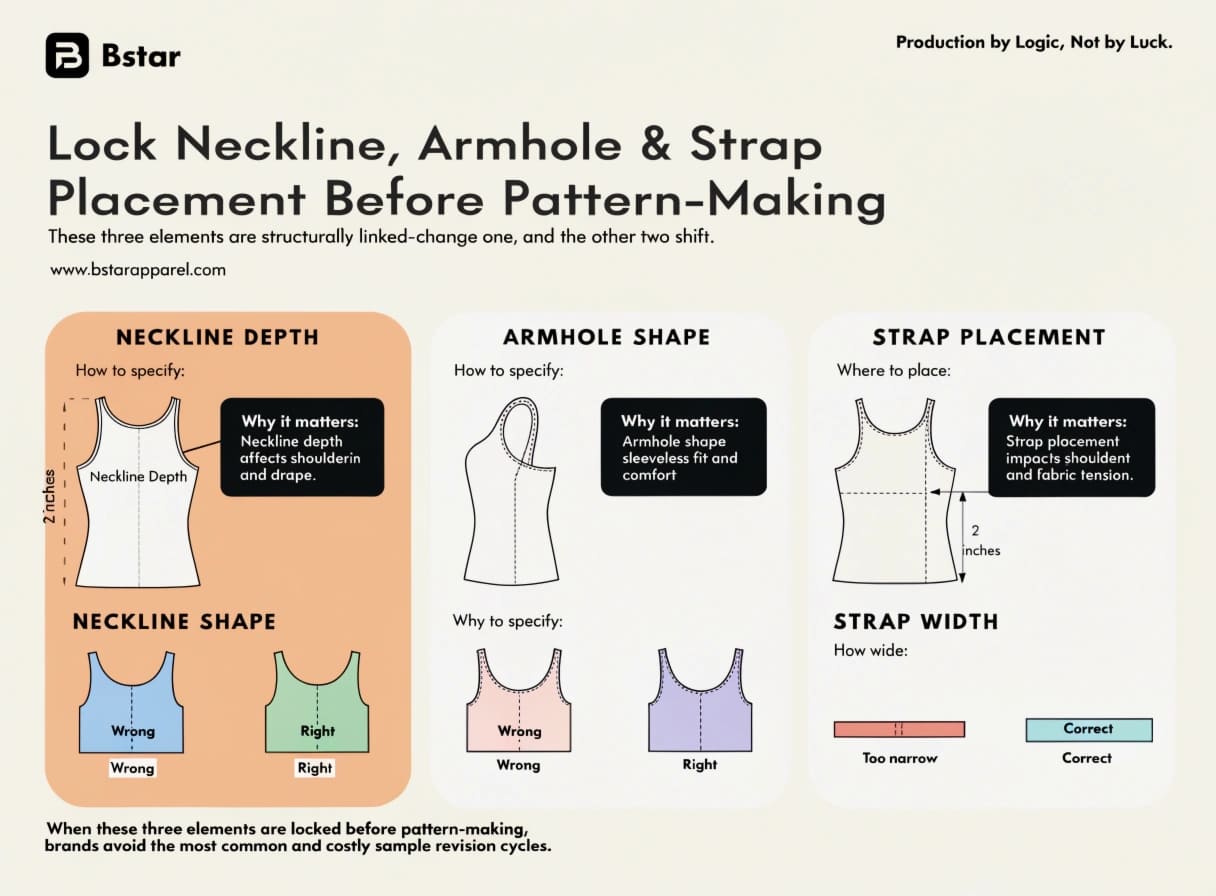
Illustration note: review these details together; neckline depth changes do not automatically move armholes or straps. The printed numbers are not approved product dimensions.
There’s more to a custom tank top development project than most first-time buyers expect. The sections below walk through each decision point, explain why it matters structurally, and tell you exactly when it needs to be confirmed.
What Are the Different Types of Necklines for Tank Tops?
Picking a neckline shape feels like a design decision. It is — but it also needs to work with shoulder coverage, armhole shape, and strap construction. A wide neckline may leave less fabric across an integrated shoulder panel. On a separate-strap camisole, define the attachment points instead.
Common tank top necklines include the crew neck, scoop neck, V-neck, square neck, and sweetheart neckline. Each can be developed at different depths and widths. The shape name does not determine strap placement or fit by itself; confirm the actual opening, coverage and edge construction for your style.
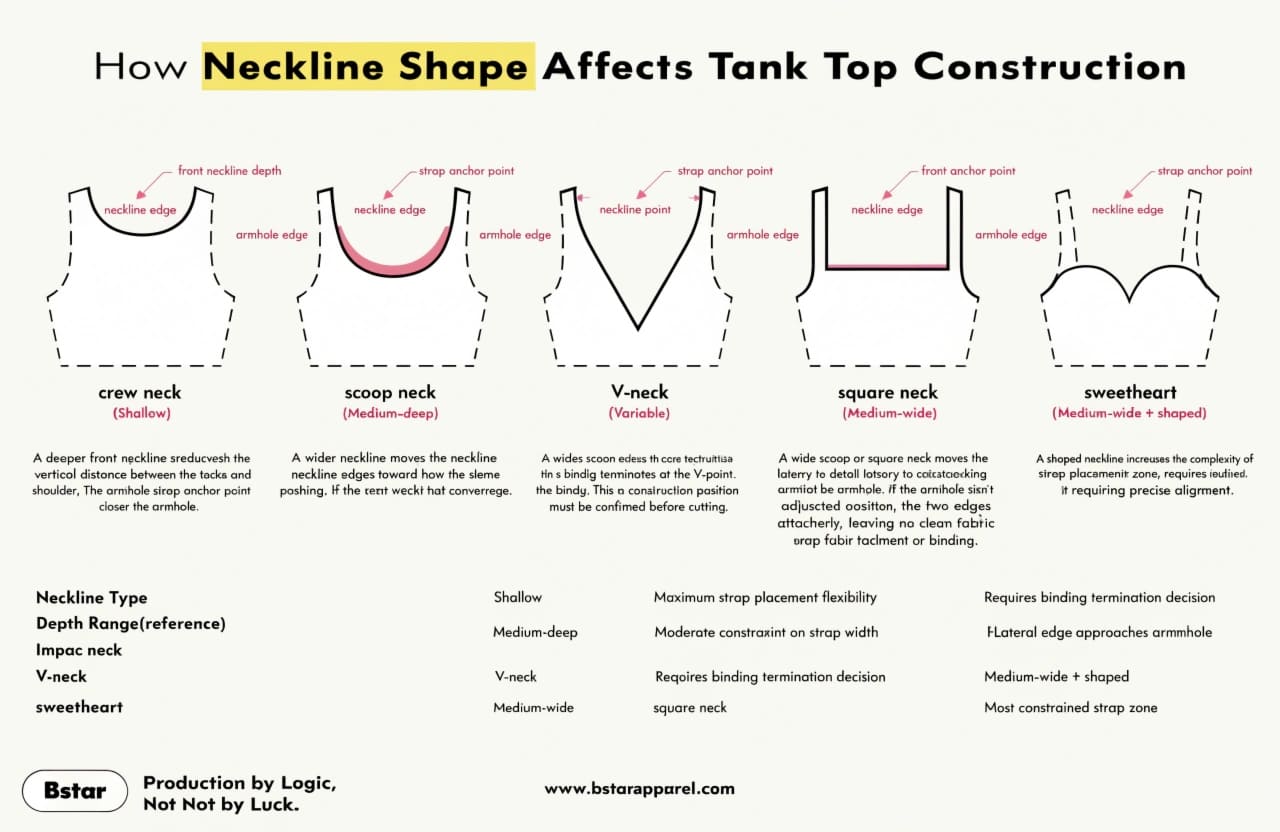
Illustration note: these neckline sketches do not define fixed depth ranges or strap constraints. Use the written comparison table below rather than the graphic’s simplified labels.
Understanding the structural logic behind each shape helps you choose one that actually works for your fit goals — not just your visual reference.
How neckline shape affects the rest of the garment
Here’s the dependency chain we walk clients through:
- A deeper front neckline lowers the front edge and changes coverage. If the neckline width and shoulder endpoints stay unchanged, the strap anchors and armhole depth do not have to move. Review edge support and gaping on the sample.
- A wider neckline can move its shoulder-side edge toward the armhole. On an integrated shoulder panel, check the remaining finished width and the space needed for seams or binding. With separate straps, confirm the attachment locations instead of assuming the same geometry.
- A V-neck needs a defined finish at the V-point. The join may be hard to identify in a reference photo, so use a detail image, sketch or sample to agree how it should look and be constructed.
In our experience, clients often use "deeper scoop" to describe the whole look. The useful follow-up is whether they want only a lower front edge, a wider opening, or different shoulder coverage as well. Those are different changes. Confirm them separately, then review the neckline, armholes and straps together on the sample.
| Neckline Type | What to Specify | Related Construction Check |
|---|---|---|
| Crew neck | Front/back drop, opening width and finished band width | Shoulder coverage and stretch needed to put the garment on |
| Scoop neck | Curve, depth and width as separate measurements | Edge support, gaping and shoulder or strap position |
| V-neck | V depth, angle and finished edge width | Binding or band join at the V-point |
| Square neck | Width, depth and corner shape | Corner finish and remaining shoulder width or strap anchors |
| Sweetheart | Curve shape, center dip and coverage | Edge stability and attachment details for the chosen strap design |
These are specification prompts, not standard dimensions. Confirm the measurements, finished-edge reference and fit block for your own style.
What Are the Measurements for a Tank Top?
Buyers often send us a size chart with chest, waist, and hip measurements — and assume that covers it. First check whether these are body or finished-garment measurements. Neither a woven garment nor a knit tank is fully defined by those three numbers; the openings and shoulder details also need references.
Key measurements for a tank top spec sheet include front/back body length, chest and hem width, any shaped waist or hip position, front/back neckline depth, neckline width, armhole depth and shape, and shoulder or strap dimensions appropriate to the style. Define each point on a marked-up sketch: start/end points, straight or curved measurement, half or full width, units, garment condition and tolerance.

Measurement illustration only: some labels, arrows and example values are inconsistent. Do not copy its numbers into a production chart. Use your agreed marked-up sketch and the measurement definitions below.
In briefs we receive, front neckline depth and the position of the straps or shoulder edges are often missing. They are worth clarifying early because they affect both the visible shape and the intended coverage.
Measurement points that brands most often skip
- Front neckline depth: for a broad-shoulder tank, agree a vertical drop from a horizontal line through HPS (high-point shoulder) to the lowest front neckline point. Mark the shoulder/neck junction and specify the finished-edge or seam-line endpoint. Use the same convention for buyer and factory.
- Back neckline depth: give it a separate measurement and reference, especially for racerback or low-back styles. On a camisole without a clear HPS, agree an alternative reference line and strap attachment points rather than guessing.
- Armhole depth and shape: define the vertical drop to the underarm point and mark the curve on front/back drawings. A vertical drop and a curved seam length are different measurements.
- Strap width: specify the finished width at a marked location, with the assembled garment resting without tension. If a cut-strip width is also needed for production, label it separately.
- Strap placement from center front/back: mark each attachment point from the center line and, where useful, the spacing between the strap edges. Define the height at which spacing is measured; front and back values may differ.
How Can a Brand Develop Its Own Tank Top?
This question usually comes from smaller DTC brands exploring private label development. You do not have to arrive with a finished technical package. Your first job is to explain the intended wearer, use, fit and visual direction; the next is to agree with the manufacturer what must be defined for the sample.
To develop a custom tank top, start with reference images or a reference garment, the intended use and fit, a base size, fabric direction, and the details you want to keep or change. Build the measurement and construction record with the manufacturer as decisions are made. A tech pack brings sketches, measurements, materials and construction notes together; it does not have to be complete before the first discussion.1
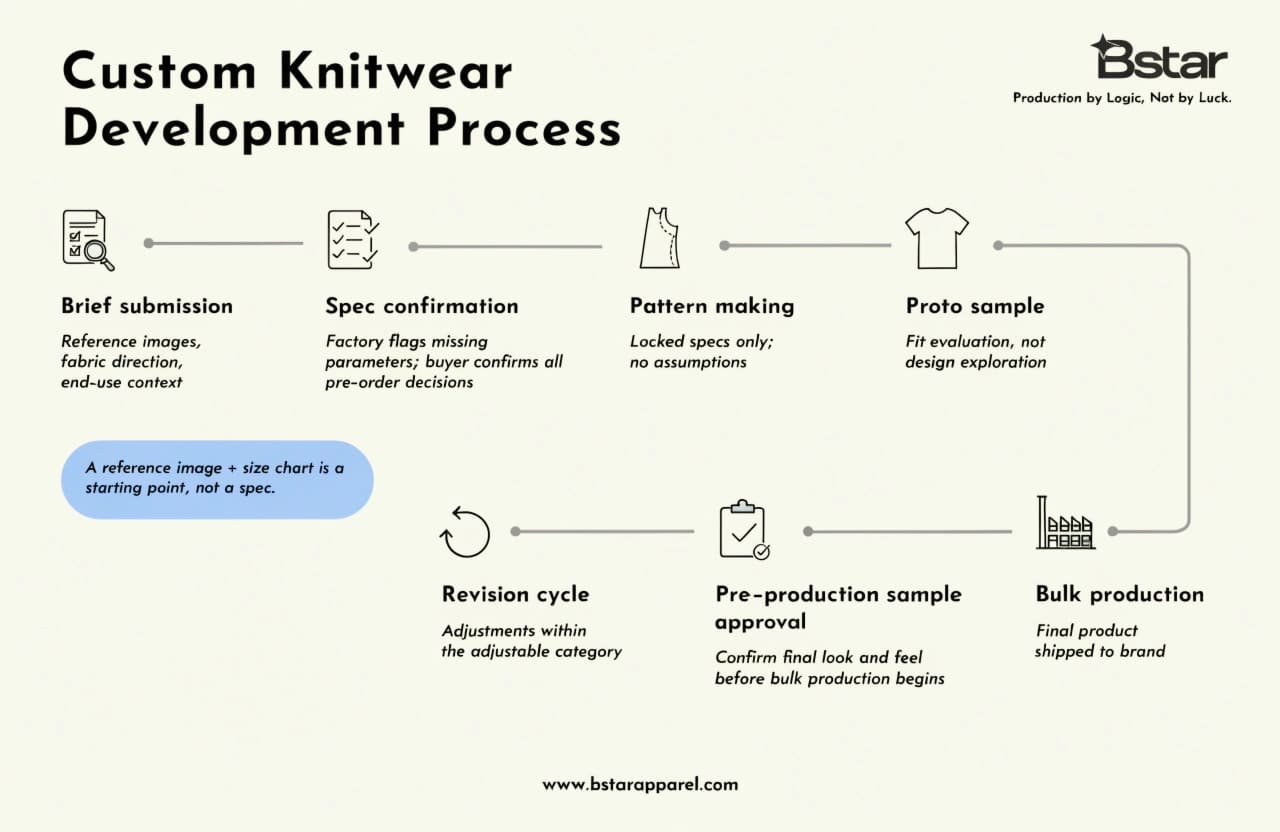
Process illustration: development samples can include design changes and further pattern work. Agree the stages for the project; this graphic does not document a fixed BSTAR procedure.
What we find with first-time buyers is that a brief can feel complete while still leaving decisions open for the pattern-maker. Annotated pictures, a measurement sheet and email confirmations can turn a reference into usable sample instructions. Adapt the relevant fields in our custom T-shirt RFQ checklist to your tank style.
The development process typically looks like this:
- Brief submission — send reference images, fabric direction, intended wearer and end use by email.
- Spec confirmation — the salesperson organizes the information for the production team; identify missing details, proposed choices and what the buyer needs to confirm.
- Pattern making — work from the current sample instructions. Label any provisional detail the first sample is intended to resolve.
- Proto sample — review fit, construction and any design detail still being developed; send the physical sample to the buyer.
- Revision cycle — collect specific feedback, update the instructions and make another sample where needed.
- Pre-production sample approval — agree which sample and written details represent the bulk product, and identify any material or construction difference still open.
- Bulk production — after buyer approval and the bulk order, produce against the approved reference and order requirements; confirm any subsequent change before the affected work proceeds.
For the sample stages and responsibilities to agree with your supplier, see our sampling and prototyping overview. The exact deliverables should be confirmed for the tank project.
What Are Different Types of Tank Tops Called?
Knowing the names matters because they communicate structural intent — but the name alone is not a spec. When a client tells us they want a "racerback tank," that suggests a back shape narrowing toward the center. It does not tell us the shoulder width, curve, coverage or whether there are separate straps at all. Ask for front and back views.
Common tank top types include standard tanks, racerback tanks, muscle tanks, spaghetti-strap camisoles, longline tanks, and crop tanks. Standard or undershirt tanks may have integrated shoulder panels; camisoles may have separate straps. Longline and crop describe length, not a particular neckline or armhole. Confirm the actual design and measurements in writing.
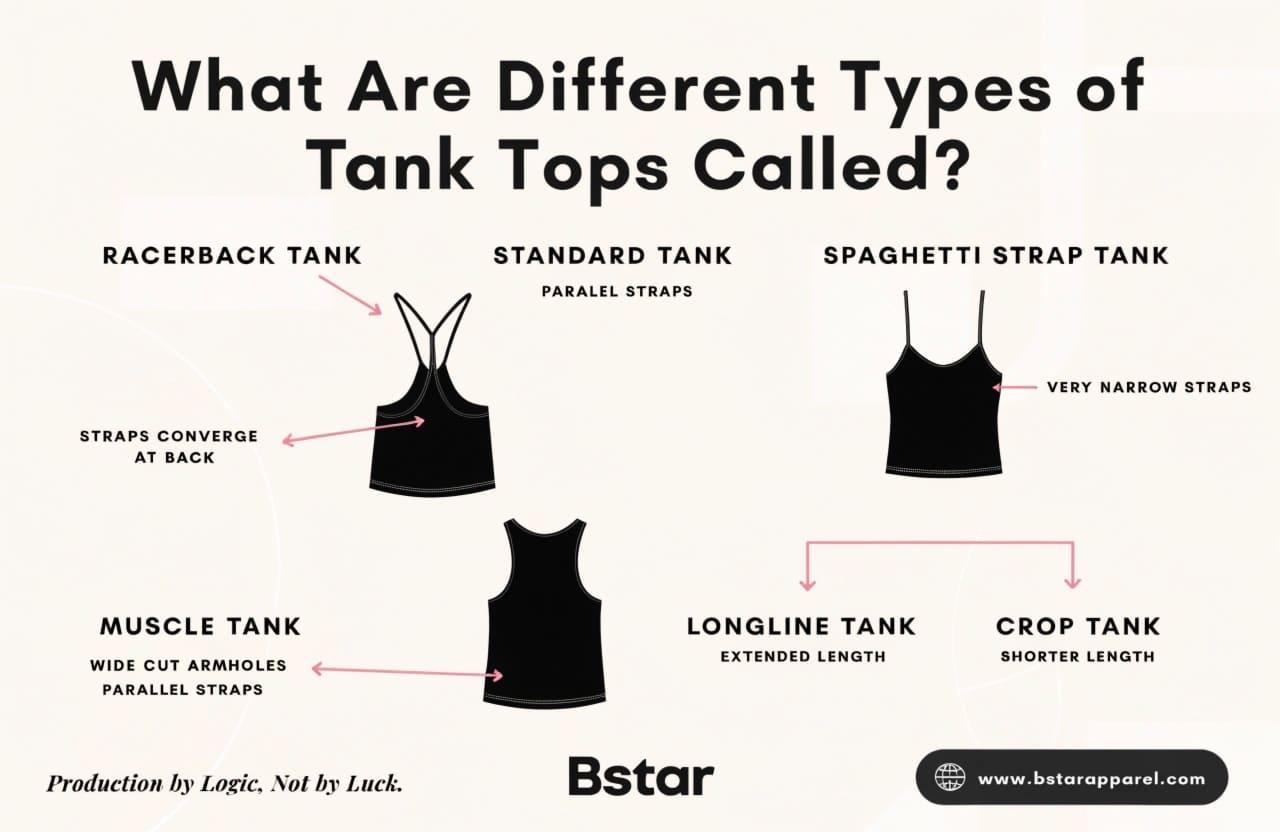
Style illustration: longline and crop describe length. Use front/back references to define the actual openings and shoulder construction.
A style name sets the category. The spec sheet sets the product. Both are necessary.
What Should Brands Confirm Before Developing a Custom Tank Top?
Before the first pattern is cut, agree enough detail for a useful sample and identify what remains provisional. A later change may require pattern work, another sample or recutting. Discuss those consequences before an order or material commitment.
Before development, brands should confirm the intended neckline, armhole coverage, shoulder or strap construction and placement, fabric direction, and edge finish as far as the brief allows. Mark unresolved details and agree what the first sample will establish. Before bulk cutting, settle the fit-critical points and identify the approved sample and current written specifications.
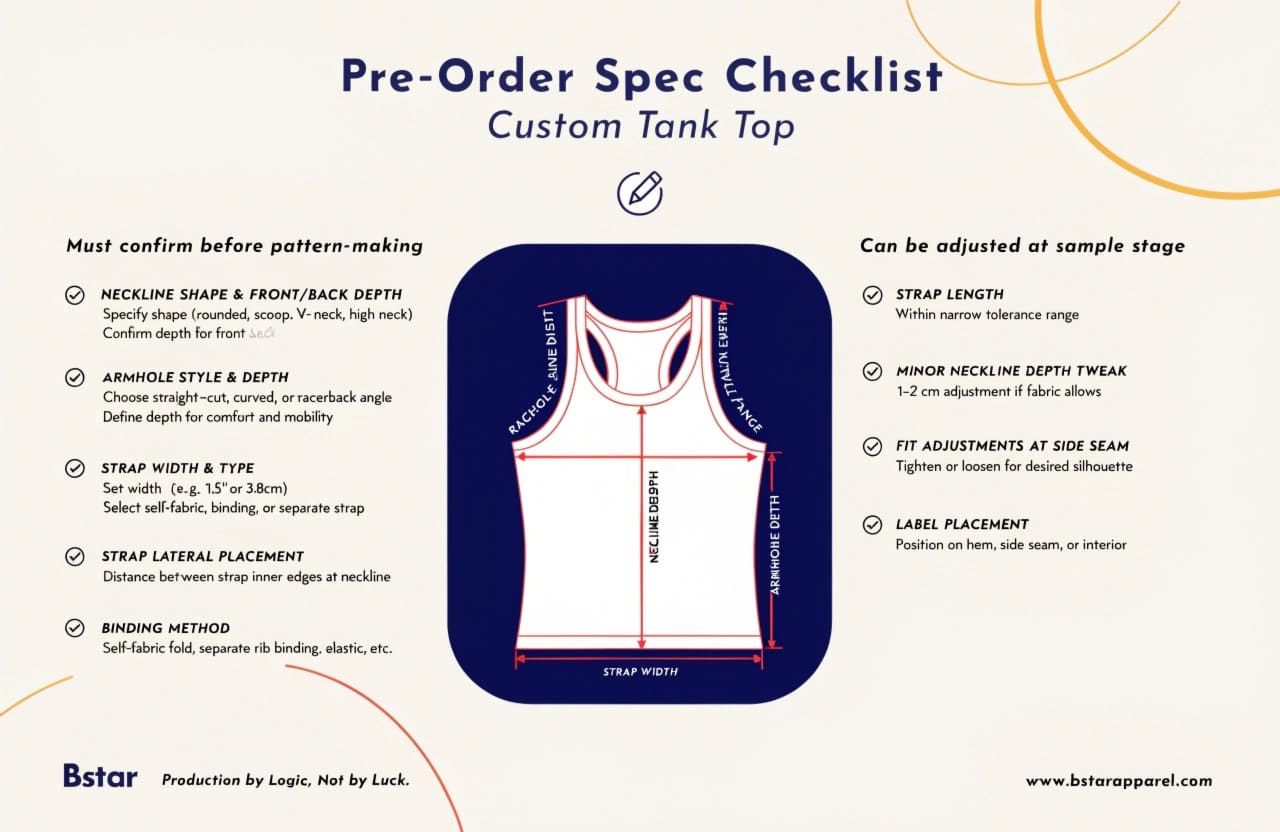
Checklist clarification: the printed 1–2 cm change is not a standard adjustment allowance or tolerance. Whether a sewn sample can be altered depends on its pattern, finish and material. The current written brief and approved revision govern the product.
Separate the first-pattern information from possible sample revisions in the email brief. The revision list does not guarantee that the existing sewn sample can be altered:
What to confirm for the first pattern
- Neckline shape and front/back depth
- Armhole front/back shape, underarm position and intended coverage
- Strap width and type
- Shoulder or strap position, with marked endpoints or attachment coordinates
- Binding method (self-fabric fold, separate rib binding, elastic, etc.)
- Fabric — composition, weight, knit structure, stretch direction and the method used to assess stretch
What may need revision after sampling
- Strap length — changing it can also change where the neckline and underarm sit on the body.
- Neckline depth or width — review the actual pattern and finish; do not assume a fixed amount can always be altered on the existing sample.
- Side-seam fit — available seam allowance, fabric and intended silhouette affect the options.
- Label placement — review the new location, attachment and any marks left by removal.
A small-looking change can still affect neighboring details. Ask the factory whether it can alter the existing sample or needs a new pattern or sample, then confirm the revised version by email. If the material is undecided, our private-label T-shirt fabric guide provides a starting point on composition, weight and knit behavior; check the final fabric and binding on the tank itself.
How Do You Specify Neckline Shape, Depth and Coverage?
A reference image communicates silhouette. It rarely gives you a usable dimension or a reliable view of how the edge is finished. Add the measurements and construction notes rather than relying on the photo alone.
To specify a neckline, define the shape, front and back depth, opening width, finished-edge reference, and binding or band method and width. Mark the measurement locations and agree a tolerance for each point. A measured difference outside that tolerance needs review; a design change requested after seeing the sample needs a revised specification.
The decisions inside "neckline shape"
When we receive a brief that says "scoop neck," we still need to know:
- How do the front and back shapes differ? Often the back neckline is shallower, but both need their own reference.
- How is the neckline edge finished? A self-fabric binding, separate rib band, turned edge, or an elastic-supported finish can look and behave differently. Identify the actual construction rather than calling all of them binding.
- What’s the finished band or binding width? A narrow finish and a wide band create different visual weight. Give the finished measurement, not just the cut-strip width.
- Does the neckline coverage affect layering or bra visibility? This is an end-use question that determines depth, and clients sometimes don’t connect the two.
Neckline depth and width are separate decisions. Lowering only the center front does not automatically shorten the shoulder panel. Widening the opening at the shoulder or moving a strap anchor can affect neighboring areas. Review that combination on the sample.
Which Armhole Measurements Affect Fit and Movement?
The armhole is an easy opening to leave to "factory standard." But that phrase does not identify the pattern, coverage or measurement method you are approving. Ask which base style is proposed, then confirm the front and back shape for your own product.
For armhole fit and movement, define the underarm position, vertical depth from the agreed reference, front/back curve, and any armhole band or binding width. Where relevant, specify across-front and across-back widths at marked heights. If you use an "armhole width" measurement, draw its endpoints: there is no single measurement with that name that works for every tank or camisole.
How armhole decisions interact with neckline and straps
- A lower underarm point increases the opening depth and can reduce side coverage. It does not by itself widen the finished shoulder panel.
- A deeper neckline and lower underarm point change front and side coverage. Check the upper body and strap position on the sample; the two depth values alone do not establish the remaining shoulder width.
- A wider armhole cut, as on some muscle tanks, can expose more of the chest or side. Review the neckline and intended layering together so that the remaining coverage matches the brief.
Movement also depends on the finished opening, fabric and sewing. A binding or seam with insufficient stretch for the intended movement can feel restrictive or distort the opening; leaving an edge unfinished is not automatically the better option. Check reaching and arm movement in the actual sample, and inspect recovery and appearance after the agreed wash procedure.
How Should Buyers Define Strap Width, Placement and Binding?
Strap specification is where we often see an information gap in client briefs. Width may be given while position relative to the shoulder, neckline or center line is left open. On a tank with integrated shoulder panels, define the finished shoulder width and seam position; on a separate-strap camisole, define each strap and its anchors.
For separate straps, define finished width, length and measuring condition, material/construction, front/back attachment positions, attachment method, and any adjustable hardware. Add an angle where the design needs it. If binding continues into a strap, show that path. For integrated shoulders, define the shoulder panel instead of inventing a separate strap attachment.
The strap placement gap
Without strap coordinates, the factory interprets the reference using a proposed block. The result may be wider or narrower than intended, and a balanced medium sample may not establish the fit of XS or XL. Agree the size chart and grading rules, then review relevant sizes. Pattern-generation research uses body-measurement-based alteration points and grading rules; it does not prescribe a universal tank strap increment.2
What we typically ask clients to confirm is where each strap meets the front and back, using a marked-up sketch and the center lines as references. The spacing between inner edges can be useful if the measurement height is defined. Front and back values need not be identical, especially on racerback styles.
Binding method matters here too. A folded self-fabric strap and a separate rib strap may behave differently. Compare the actual materials, stretch direction, finished width, seam construction and recovery; rib is not automatically stronger in recovery or better at staying on the shoulder. Check the assembled sample during wear rather than choosing from the knit name alone.
What Should Buyers Check on Tank Top Samples Before Approval?
Receiving a sample is not the end of specification work. It is a chance to compare the garment with the current instructions and decide whether the fit or design needs changing. Separate a production deviation from a new design preference so that both sides know what to do next.
Before approving a tank top sample, buyers should verify: neckline depth and shape against spec, armhole depth and symmetry, strap width and placement (measured, not just visually assessed), binding width and construction quality, overall length and body measurements, and fabric hand feel and stretch recovery.
Sample review checklist
- Measure, don’t just look. Use the agreed method and point-specific tolerances. Record actual measurements; a photo alone cannot show whether a sample meets them.
- Check both sides. Strap placement and armhole symmetry should be verified on both left and right.
- Check the opening during wear. Look for pulling, gaping, waviness or seam strain. A gentle hand check can flag an issue, but it is not a standardized stretch or durability test.
- Wear-test the strap. Does it stay in the intended position during movement, or slide inward or off the shoulder? Include coverage when reaching, bending and raising the arms.
- Compare back neckline depth to spec. This is frequently missed in visual review.
- Check strap attachment points. Do the stitching, reinforcement and any hardware match the agreed construction? A bar tack is not required for every style; the attachment needs to suit the material and expected strain.
- Check after washing. Use the agreed care procedure and compare dimensions, edge shape, strap length and appearance before and after. Record the method and results; do not assume an unwashed approval covers wash performance.
For an out-of-tolerance measurement or missed construction detail, send the factory measurements and marked photos and agree the correction. Do not leave fit-critical issues as an unspecified "fix it in bulk." For design changes, update the brief and sample version. Confirm approval by email and retain the reference sample. Adapt the related checks in our T-shirt sample approval checklist to the tank project.
Frequently Asked Questions
Can I just send a reference photo instead of a tech pack?
Yes, you can start with reference photos or a reference garment, especially if you do not yet have a tech pack. Add front/back views, intended use, a base size and notes about what you like or want changed. Ask the manufacturer to flag missing dimensions and construction choices. Confirm the proposed sample details in writing before cutting; a photo is the beginning of that discussion, not the final production specification.
How many sample rounds should I expect for a custom tank top?
There is no fixed round count for every custom tank. It depends on how settled the design is, material availability, fit changes and what each sample is intended to approve. A clearer brief can reduce avoidable misunderstanding, but it cannot guarantee approval in one or two rounds. Agree the sample scope, revision arrangement and likely timing with the factory; use each round to close specific open points.
Does changing strap width require a new pattern?
It depends on the construction. Widening an integrated shoulder panel changes a neckline edge, an armhole edge, or both. Changing a separate strap may mainly affect the strap piece and attachment area. Ask which pattern pieces and finishes need updating; a whole new body pattern is not automatic. Confirm any effect on the next sample, cost and schedule before proceeding.
What’s the most common spec mistake brands make on tank tops?
In our experience, it is leaving strap lateral placement unspecified. Buyers focus on strap width because it is visible in a photo. The distance between the straps and where they sit relative to the shoulder and neckline also affect the result. Review those positions alongside the body measurements and intended fit across sizes.
Do certifications like OEKO-TEX® affect tank top construction?
OEKO-TEX® STANDARD 100 concerns harmful-substance testing of textile articles and their components.3 GOTS covers certified organic fibres and requirements across processing and the supply chain.4 Neither replaces checking pattern, fit or strap construction.
For BSTAR projects, state any certification requirement when requesting a quote. Check the actual certificate holder, number, validity, product scope and order applicability. GOTS-related sourcing needs appropriately certified suppliers and the applicable certification chain for the finished product. Certified fabric alone does not make the finished tank GOTS-certified; coverage must be verified for the order.
Conclusion
Specifying a custom tank top comes down to reviewing necklines, armholes, and straps together while giving each a clear definition. A lower neckline, a wider shoulder and a moved strap are different changes. Write down what you want the sample to establish, then update the measurements and construction notes when the design changes.
The information gaps are often small details a photo cannot settle, like strap attachment points, the finished width of a band, or the way an armhole is measured. Getting those into an email brief or measurement sheet gives the buyer and factory something concrete to review. It helps reduce avoidable revisions without pretending that every fit decision can be resolved before the first sample.
If you’re preparing a custom tank top brief, contact our team with your reference images, intended use and any measurements you already have. We can discuss what is still missing and what the first sample needs to confirm.
-
Techpacker, The Ultimate Guide to Tech Packs in Fashion. This software provider’s guide describes the sketches, measurements, materials and construction information in a tech pack. ↩
-
Hosun Lim and Cynthia L. Istook, Automatic Pattern Generation Process for Made-to-Measure, Journal of Textile and Apparel, Technology and Management, Volume 7, Issue 4 (2012). Research on body-measurement-based alteration points and grading rules, rather than a tank-top strap-spacing standard. ↩
-
OEKO-TEX®, STANDARD 100. Official information on harmful-substance testing, product classes and certificate verification. ↩
-
Global Standards, GOTS: Key Features. Official information on organic fibres, processing, certification of the supply chain and traceability. ↩
Discussion & questions 0 comments