
How to Test Heat Transfer Labels on Underwear Before Bulk Production
Some brands don’t discover a labeling problem until after the bulk order arrives. By then, the heat transfer labels are peeling, the ink is cracking after three washes, or the adhesion on the spandex panels is simply wrong. That’s an expensive lesson. Testing heat transfer labels on underwear before bulk production exists precisely to prevent it — but only if you test at the right stage, with the right variables isolated.
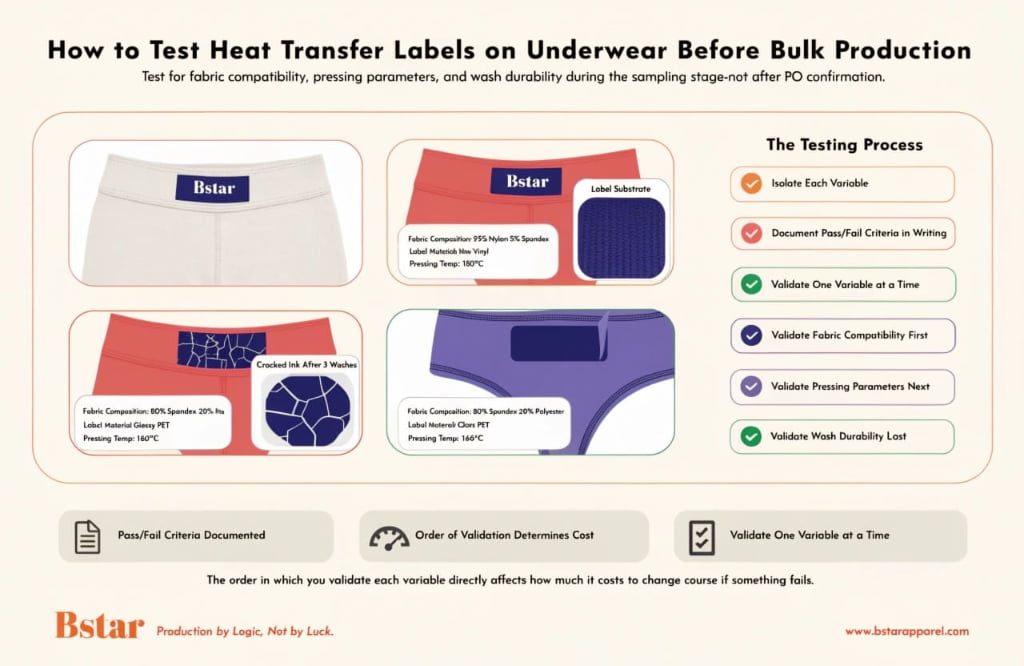
Testing heat transfer labels on underwear before bulk production means checking the actual fabric-and-label combination, recording pressing conditions, and assessing adhesion, print condition and legibility after agreed washing and stretching. Start during development, then confirm the production-intent sample before bulk label application. Change one variable at a time where practical, and agree acceptance criteria before testing.
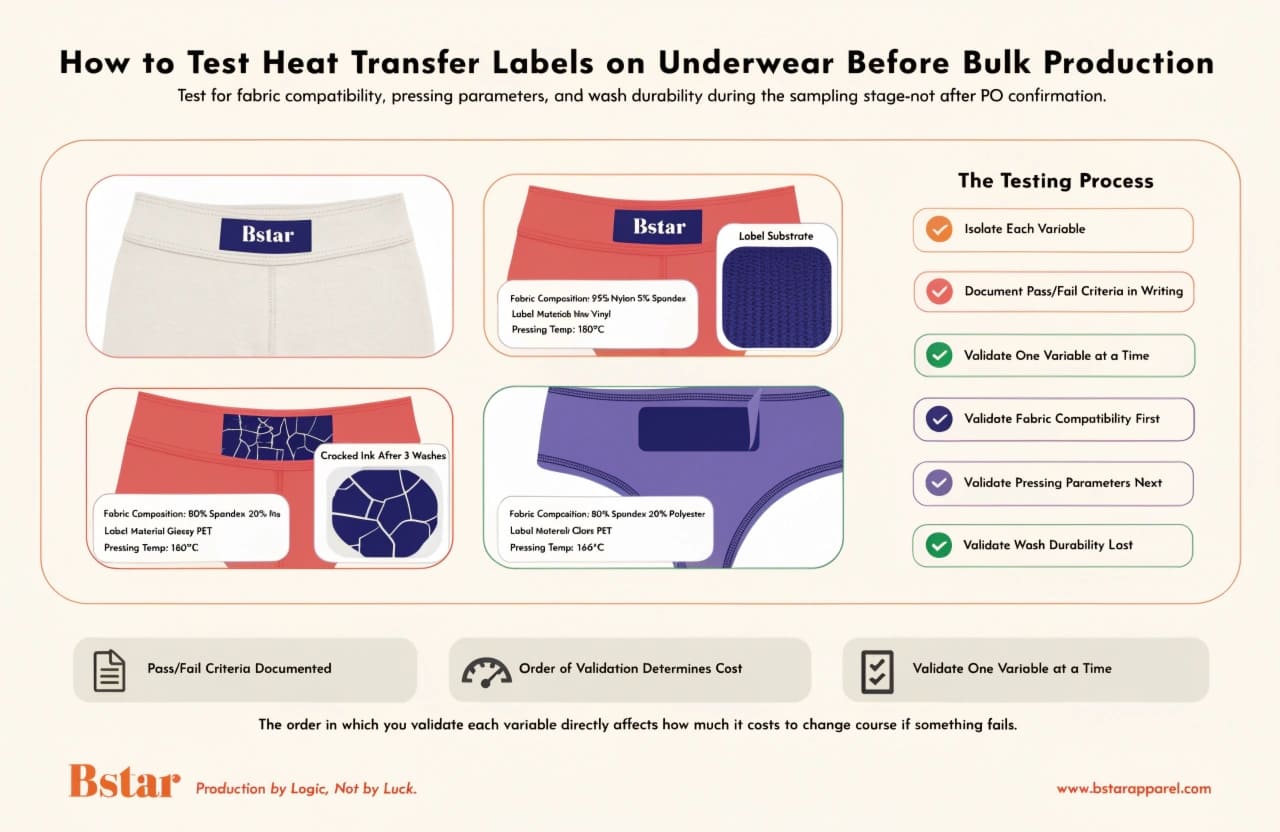
Illustration of the testing workflow, not a production test record. Begin during development and confirm the final fabric-and-label combination again before bulk application.
Understanding what to test is only half the picture. The more important question is when and in what sequence — because the order in which you validate each variable directly affects how much it costs to change course if something fails. The BSTAR Underwear Lab connects this label-specific review with the wider material and garment testing plan.
Can you heat press 100% polyester?
Brands moving into activewear or performance underwear often ask this question first — usually after a supplier quotes them a polyester fabric option and they’re not sure how it will behave under heat.
Yes, you can heat press 100% polyester when the transfer system and application conditions are suitable for that fabric. Heat marks, dye migration, distortion and poor adhesion are risks to check; 150°C is not a universal damage threshold. Transfer Express, for example, offers a product-specific low-temperature DTF transfer for heat-sensitive polyester.1 Use the selected transfer’s instructions and test the actual material.
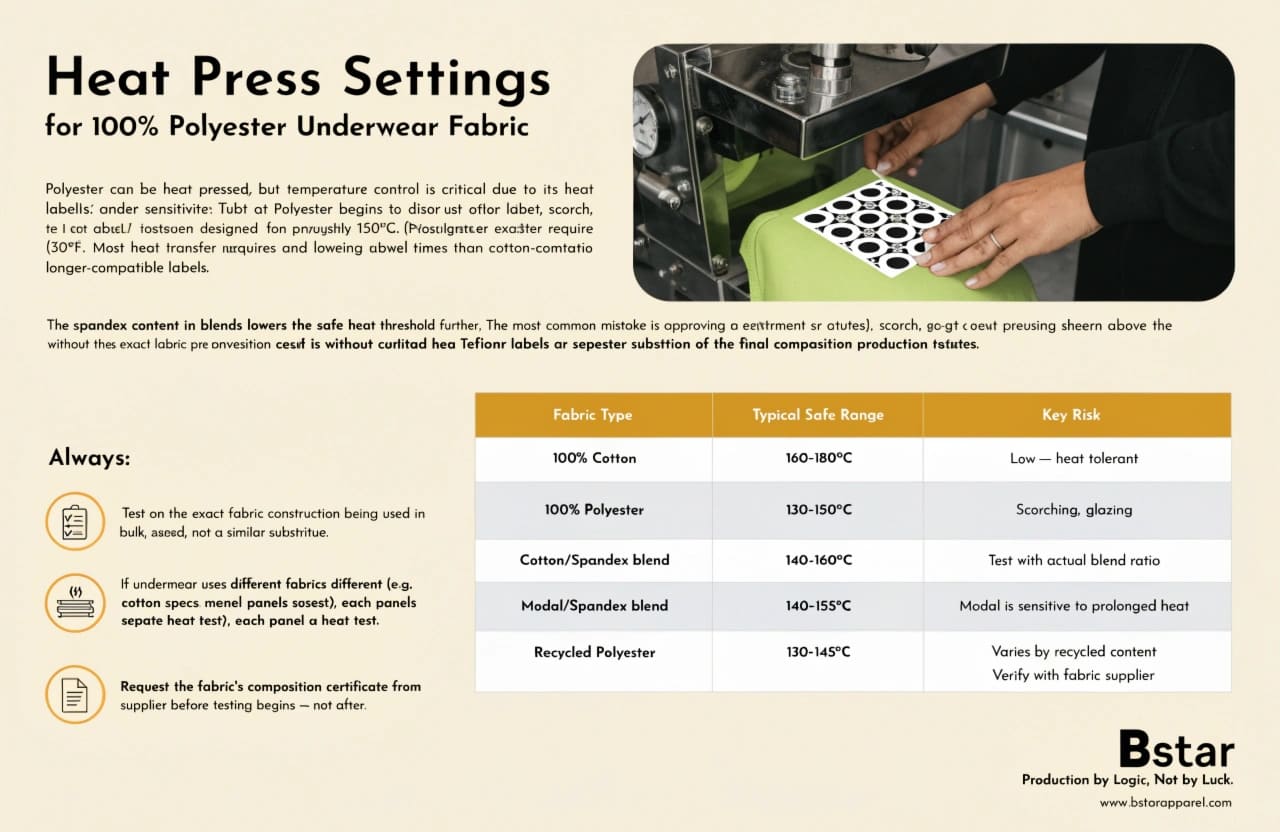
Illustrative settings only. The graphic’s temperature ranges are not universal safe limits; the experience table below explains their scope. Use the current instructions for the selected transfer and test the actual fabric.
This matters for underwear buyers because polyester isn’t a monolith. Recycled content, filament size, knit structure, dyeing, finishing and elastane content all need to be identified; recycled polyester can also be a microfibre or part of an elastane blend. Avery Dennison’s Agility guidance distinguishes heat-sensitive fabrics from heat-tolerant ones and calls for testing each fabric before bulk production.2 Fibre names alone cannot set the press conditions.
Why fabric composition is the hidden gate
From what we see in buyer consultations, the most common mistake is approving a label design and pressing spec without first confirming the exact fabric composition of the final production run. A buyer tests a label on a cotton sample, approves the spec, and then the factory switches to a cotton-modal blend for the actual waistband or gusset panel. The adhesion fails in wash testing, and both sides spend two weeks arguing about who owns the problem.
Here’s a practical breakdown of how fabric composition changes the heat pressing equation:
| Fabric Type | BSTAR Observed Press-Setting Range | Risk to Review | Record Alongside the Setting |
|---|---|---|---|
| 100% Cotton | 160–180°C | Adhesion, heat marks or hand-feel change | Exact transfer system, time and pressure |
| 100% Polyester | 130–150°C | Scorching, glazing or dye migration | Fabric color, finish and transfer compatibility |
| Cotton/Spandex blend | 140–160°C | Stretch or dimensional change | Actual blend, construction and recovery |
| Modal/Spandex blend | 140–155°C | Hand-feel or dimensional change | Surface finish and exposure time |
| Recycled Polyester | 130–145°C | Fabric- and transfer-specific response | Exact material reference and supplier instructions |
In BSTAR production runs, these settings have been used with particular fabric-and-transfer combinations. They are observed application settings, rather than material safety limits. Record the transfer, press, time and pressure alongside the temperature so the result has context. The table covers several transfer systems, not only DTF. For a new combination, start with the selected transfer supplier’s current instructions and verify the result on the actual fabric.
- Always test on the exact fabric construction being used in bulk, not a similar substitute.
- If your underwear uses different fabrics for different panels (e.g., cotton body, polyester mesh gusset), each panel needs a separate heat test.
- Request the fabric’s specification and material reference, with composition evidence where required, before testing begins — not after.
Can I print my own heat transfers?
Some DTC founders ask this early in the process, usually because they want to prototype quickly or keep label costs low before committing to a large minimum order quantity.
Yes, you can print your own heat transfers using compatible inkjet or laser transfer paper, or a DTF (Direct to Film) setup. For an underwear production approval, the important question is whether the tested transfer, ink, adhesive, equipment and fabric match the proposed bulk process. A home-printed mock-up cannot establish the performance of a different commercial transfer.
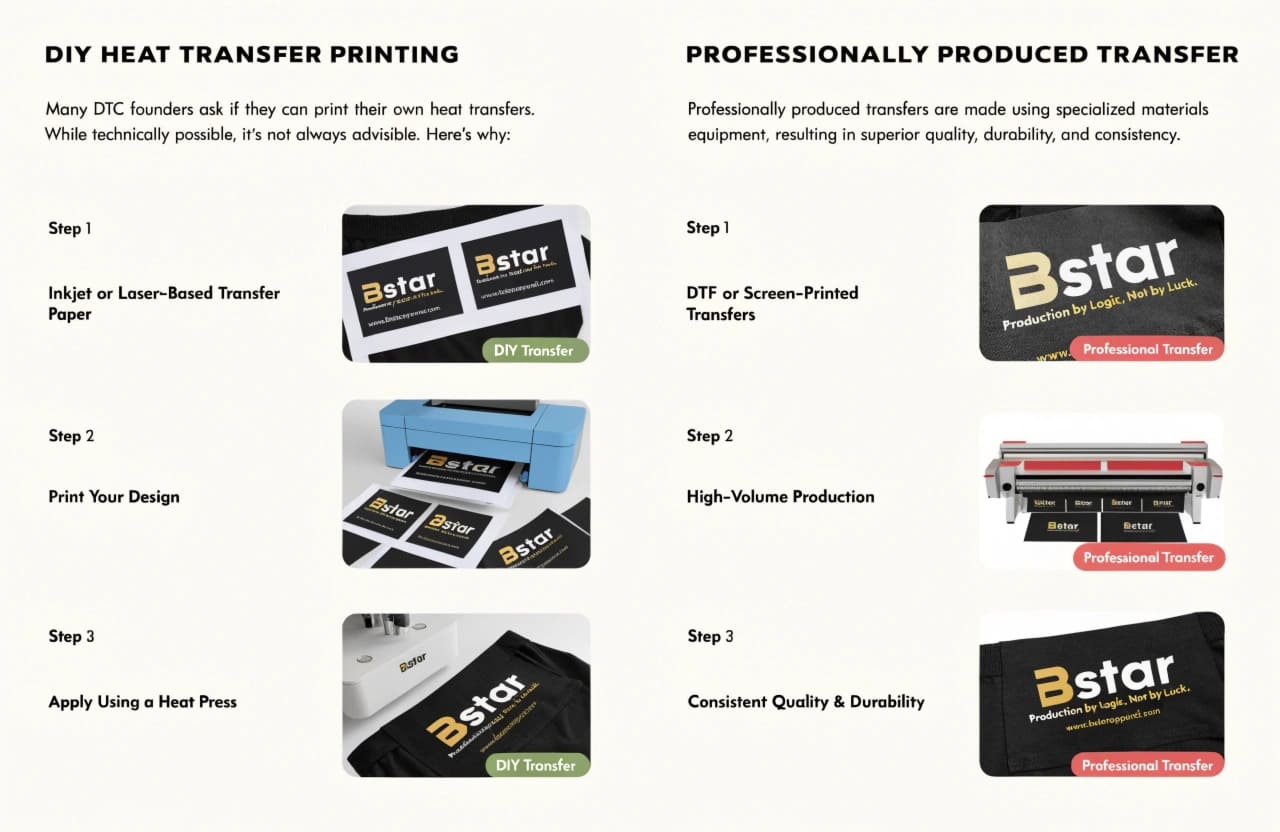
Prototype and production routes illustrated. Supplier category alone does not establish quality; approve the actual transfer, application process and fabric through testing.
The honest answer depends on what "your own" means in practice.
The difference between prototyping and production intent
Printing your own transfers makes sense for testing label placement, sizing, and general aesthetics. It does not reliably replicate the adhesion behavior of a commercially produced transfer on an underwear fabric — especially after repeated wash cycles.
Here’s why this distinction matters for buyers:
- Inkjet transfer paper must match the printer, fabric color and application route. Its coating and adhesive system may differ from the transfer selected for bulk.
- DTF transfers (Direct to Film) can be used for a production-intent sample when the film, ink, adhesive powder, curing and application process match the planned bulk route. Those details affect how the label behaves on stretch fabrics.
- Screen-printed heat transfers from a specialist supplier are another production option. Confirm the product reference, batch controls and performance on your actual fabric rather than assuming this process is always the most consistent.
A practical way to use this: print your own transfers to confirm label design and placement. Then send those confirmed specs to your label supplier for a professionally produced sample. Test that sample against your acceptance criteria before approving bulk production. Don’t use the prototype test results as a proxy for the production label performance — they’re different products. Include that distinction in the Sampling & Prototyping plan so the purpose of each sample is clear.
What is the best DTF heat setting for 100% cotton?
DTF (Direct to Film) is one option available from specialist clothing-label suppliers, including Dutch Label Shop.3 Cotton underwear is often the starting point for brands asking about application settings.
There is no single best DTF heat setting for all 100% cotton underwear. DTFTransfers publishes a standard cotton heat-press example of 310–325°F (about 154–163°C) for 12–15 seconds.4 Transfer Express lists a different product-specific combination for UltraColor Max: 290°F (about 143°C), 12–15 seconds and a hot peel.1 These are supplier examples, not interchangeable instructions. Use the current specification for the transfer you are actually buying.
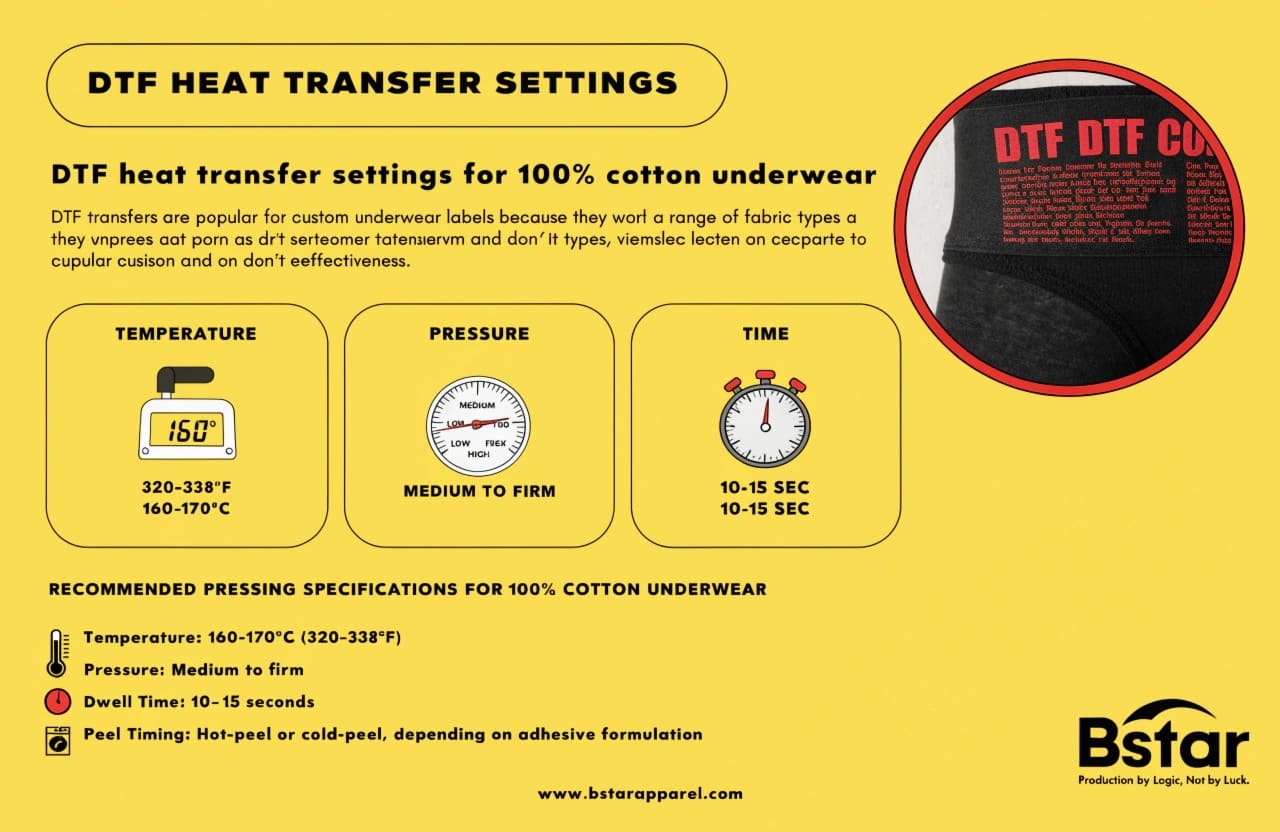
The temperature, time and pressure shown in this illustration are not a recommendation for every DTF transfer. Follow the selected supplier’s current product instructions; the verified examples in the text refer to different systems.
That said, "100% cotton underwear" still isn’t a single material category. Cotton rib, cotton jersey, cotton terry, and cotton fleece all have different surface textures and moisture contents, and all respond slightly differently to heat and pressure.
What buyers should validate — not assume
From buyer consultations we’ve had around DTF labels on cotton underwear, these are the variables that most commonly cause problems when left untested:
-
Pressure consistency. A label that adheres perfectly under firm pressure from a professional heat press may peel after two washes when applied with inconsistent pressure on a production line. Ask your supplier how pressing pressure is calibrated and monitored during bulk application.
-
Peel timing. DTF transfers can require a hot, warm or cold peel depending on the transfer system. Follow that product’s instruction. In BSTAR’s sampling discussions, premature peeling has left small edge lifts that became more obvious after washing.
-
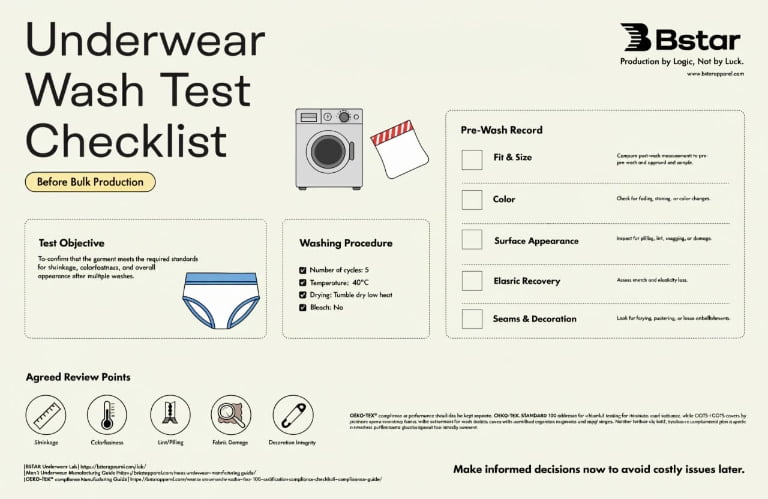
Wash protocol used in testing. "Passed wash test" means little without the temperature, detergent, drying route, cycle count and interval between application and the first wash. Select these around the care instruction and buyer requirement. The underwear wash test checklist provides the wider garment record; ISO 6330 defines domestic washing and drying procedures for textile testing.5
-
Edge adhesion and artwork geometry. Fine lettering, isolated details, corners and the overall adhesive area can behave differently when the base fabric stretches. Compare the actual design on the actual panel; rounded corners or a changed outline should not be assumed to solve every lifting problem.
The practical next step is to ask your DTF label supplier for the application specification for that transfer and fabric, then record and test the combination before scaling up.
How to make heat transfer labels for clothing?
Brands at the early design stage often ask this as a general question. The real question they’re working toward is: how do I get from a label design file to a tested, approved label that’s ready for bulk production?
Heat transfer labels carry a printed design and a compatible adhesive system on a release carrier. Heat and pressure transfer the design to the garment; the production sequence and peel procedure depend on the system. Label suppliers may provide ready-to-apply sheets, individual transfers or rolls. For the buyer, the approval task is to confirm the specified label on the finished product.
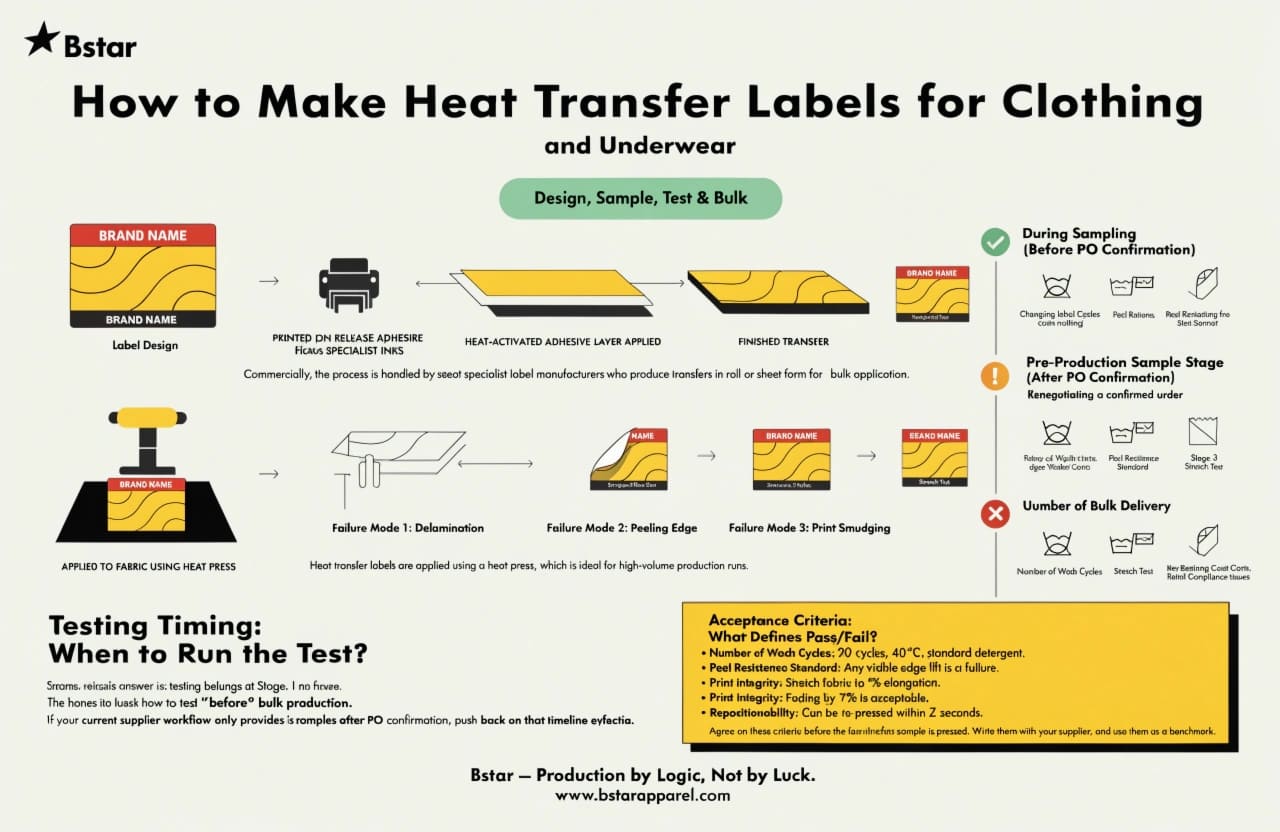
Workflow illustration, not a BSTAR test report. Cycle counts, percentages and re-press timings printed in the graphic are not project acceptance criteria. Use the agreed test plan and supplier instructions, including final pre-production confirmation.
For buyers working with a contract manufacturer, this process is usually handled end-to-end by the factory or a nominated label supplier. What you’re actually managing is the specification, approval, and testing process — not the manufacturing itself.
The testing timeline that most buyers get wrong
This is the part that costs brands the most money, and it’s rarely discussed directly. Buyers typically test heat transfer labels at one of three stages:
- Stage 1 — During development: Start compatibility checks while fabric, label size, artwork and transfer system are still being selected. Changes can still incur sample, material or setup costs, but there is less committed inventory to rework.
- Stage 2 — At pre-production approval: Confirm the actual production-intent fabric, label version, placement and application process before bulk label application. This remains a necessary checkpoint, even if a purchase order has already been agreed.
- Stage 3 — Upon bulk delivery: Receipt inspection can identify a problem, but it is too late to prevent that batch from being made. Earlier testing reduces the chance that this is the first performance check.
The article title asks how to test before bulk production. Start early, then verify the final combination at the appropriate pre-production gate. A development test on substitute material is not final approval for a later material change. The Men’s Underwear Manufacturing Guide places this approval inside the wider production handover.
Documenting acceptance criteria before testing begins
The second issue buyers skip is defining what "pass" and "fail" actually mean before they run the test. Without written criteria, a supplier’s "passed" and your "failed" can refer to completely different benchmarks.
Before you test, agree on and document:
- Wash plan: method or agreed procedure, cycle count, temperature, detergent, drying route and any required waiting time after application.
- Adhesion assessment: define how lifting or separation is assessed. If a measured peel-force result is required, name the method, specimen and equipment separately from a visual inspection.
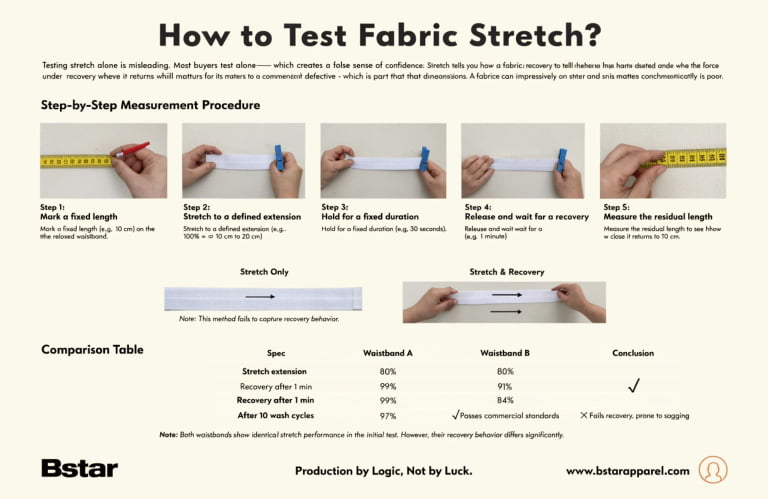
- Stretch review: define the extension or load, number of repetitions, hold and recovery intervals, and whether the check is before or after washing.
- Print integrity: agree what must remain legible and how cracking, fading, dye migration or loss of detail will be assessed.
- Rework: confirm whether the supplier permits re-pressing or removal, and what must be retested after a change.
Write these down. Share them with your supplier before the first sample is pressed. This protects both parties and turns a subjective visual inspection into a repeatable, auditable process.
A practical label test sequence to record
Use these as project checkpoints, adapting them to the selected transfer and the buyer’s requirements:
- Identify the sample. Record the style, size, fabric reference, color and finish, transfer supplier and product code, artwork version and placement. Keep an untested reference where the plan requires one.
- Record the baseline. Photograph the label and surrounding panel at a consistent distance and light. Note initial legibility, hand feel, edges and any fabric marks.
- Apply and document. Record the press, temperature, dwell time, pressure setting and how it was checked, supporting pad or cover sheet, peel procedure and any permitted second press. When comparing settings, identify which variable changed.
- Respect the waiting period. Follow the selected product’s cooling, conditioning and pre-wash instructions. Dutch Label Shop’s own DTF labels, for example, have a stated wait before washing; that instruction belongs to that product, not every transfer.6
- Run the agreed wash and dry route. Keep the procedure consistent between samples. Record the planned checkpoints and photograph changes, rather than reporting only “wash passed.”
- Review stretch and recovery consistently. Use the defined extension, repetitions and rest period before comparing cracking or edge lifting. The waistband stretch recovery guide explains why an extension number alone is incomplete.
- Inspect the label and base fabric. Record edge lifting, cracking, separation, color migration, loss of opacity or legibility, stiffness, pressure marks and any change in the panel’s stretch or appearance. An approved photograph can support an agreed visual requirement.
- Make the decision traceable. Record pass, revise or retest against the written criteria, with the sample ID, date and reviewer. A changed transfer, fabric, artwork or press setup needs a decision on whether earlier evidence still applies.
This is a development and production-approval framework. Do not present it as a named laboratory test unless the required method, equipment and reporting have actually been followed.
Heat Transfer Label Design for Custom Underwear
Label design is often treated as a branding conversation, but for underwear specifically, it has a direct impact on how the label performs in wear and wash.
For custom underwear, heat transfer label design should account for the fabric’s stretch direction, placement zone, artwork geometry and size relative to the application surface. Check the actual design and position on a sample: a rounded outline, a small logo or a familiar placement does not establish adhesion by itself.

Underwear puts a label in repeated contact with stretch, washing and skin. A label that performs well on a T-shirt hem may behave differently on a waistband extended to 160% of its resting length. That describes a 60% extension example, not a required test level. For custom men’s underwear, record the actual placement and intended movement in the product brief.
Design factors that affect performance
- Label placement relative to seams: A raised seam or uneven support can prevent the label area from receiving the intended contact and pressure. Check the actual panel, press bed and label position. Agree a suitable clearance for that construction instead of treating 5mm as a universal rule.
- Label size vs. fabric panel size: Oversized labels on small panels (e.g., a side seam patch on a brief) create tension at the edges. Design labels to fit within the flat zone of the panel.
- Font and detail size: Fine details and small font sizes are harder to achieve consistently with heat transfer printing on stretch fabrics. Test legibility at production scale, not just on screen.
- Color opacity on dark fabrics: Brands moving from white or light underwear to dark colorways often underestimate how adhesive layers affect color vibrancy. Test on the actual fabric color, not a substitute.
If the transfer carries required product information, confirm its content as well as its appearance. For US-market textile products, the FTC’s textile and wool guidance explains relevant fibre, origin and responsible-business identification requirements.7
For brands we work with that have OEKO-TEX® or GOTS requirements, the transfer’s inks, adhesive and relevant components also need a document review. Confirm the applicable scheme, product, scope and supporting evidence with the supplier and certification body.8 A material document does not automatically certify the whole garment or establish wash durability.
Frequently Asked Questions
How many wash cycles should a heat transfer label on underwear survive?
There is no universal wash-cycle minimum for every underwear heat transfer. Agree the care route, checkpoints and acceptance criteria with the buyer and label supplier. A legal label requirement is a different question: for garments covered by the US FTC Care Labeling Rule, care labels must remain attached and legible during the product’s useful life.9 Use the applicable care-label requirement alongside the buyer’s documented durability test plan.
Does label placement affect adhesion on stretch underwear fabrics?
Yes. Placement affects contact during pressing and movement during wear. The supplier’s application instructions should be followed on the actual garment panel.6 A flat pressing area is useful, but the center back of a waistband can still stretch substantially; confirm the position on that style rather than assuming it is always a low-stretch zone.
Should I test heat transfer labels on washed fabric or unwashed fabric?
Start with the fabric in the condition in which the transfer will actually be applied during production. If a pre-wash, finishing change or other treatment is planned, include that condition in the comparison and record it. Then test the applied label after the agreed laundering route. A result on prewashed fabric should not approve an unwashed production process without checking the difference.
What certifications should I check for heat transfer label inks?
Check the documentation required by the actual product claim. OEKO-TEX® STANDARD 100 addresses harmful-substance testing of textile articles and components; GOTS has its own input, processing and certification requirements.8 Ask for documents identifying the material or chemical product, holder or supplier, scope, validity and applicable standard version. Verify suitability with the certification body where required; a GOTS-approved input and a GOTS-certified finished garment are different claims.
Can heat transfer labels be removed and replaced if they’re applied incorrectly?
Do not assume a pressed label can be removed or repositioned without damaging the print or base fabric. A supplier may allow a controlled re-press for incomplete bonding, but that is different from removing and replacing a misplaced label. Confirm the permitted correction procedure and retest any reworked sample before accepting the process.
Conclusion
Testing heat transfer labels on underwear before bulk production is less about finding the right temperature setting and more about validating the right combination of variables — at the right time. Fabric composition, label substrate, pressing parameters, and wash protocol all interact. None of them can be tested in isolation and considered "done."
The most important shift for buyers is timeline. Start compatibility testing during development and confirm the actual production-intent combination before bulk label application. Earlier changes can still cost time and money, but they are easier to manage than reworking finished inventory. Define what "passed" means in writing, share it with your supplier, and connect it to the approved sample and production sign-off.
If you’re developing custom knitwear underwear with private label branding, contact the BSTAR team with your fabric reference, label artwork, intended care instruction and testing requirements. We can review the sample scope and the information needed before agreeing the next production step.
-
Transfer Express, “UltraColor Max DTF Transfers,” https://www.transferexpress.com/ultracolor-max, and “Choosing a Heat Transfer Type,” https://www.transferexpress.com/choose-heat-transfer-type. The named transfer and current product instructions define the scope of these manufacturer examples. ↩ ↩
-
Avery Dennison (2012), “Agility Heat Transfers — Technical Information,” https://www.averydennison.com/content/dam/averydennison/rbis/global/en/product-families/Heat-Transfers/docs/Agility-product-information-v1.pdf. This product-specific technical sheet distinguishes fabric/application conditions and calls for fabric testing before bulk use. It is an example of scoped supplier guidance, not a current application recipe for every transfer. ↩
-
Dutch Label Shop, “Custom DTF Heat Transfer,” https://www.dutchlabelshop.com/en_us/dtf-heat-transfer-labels/. Product information for the supplier’s DTF clothing labels. ↩
-
DTFTransfers, “What Temperature Is Best For DTF Transfers?”, https://dtftransfers.com/blogs/news/what-temperature-is-best-for-dtf-transfers. The supplier gives different application conditions by material, equipment and peel system. Confirm the current instructions for the product purchased; generic examples do not qualify a different transfer. ↩
-
International Organization for Standardization, “ISO 6330:2021 — Textiles — Domestic washing and drying procedures for textile testing,” https://www.iso.org/standard/75934.html. The standard defines washing and drying procedures; the buyer’s label acceptance criteria and chosen assessment checkpoints remain separate project requirements. ↩
-
Dutch Label Shop, “How do I Apply DTF Heat Transfer Labels?”, https://www.dutchlabelshop.com/en_us/faq/jariksmartranking.nl/. The supplier explains positioning, pressing, cooling, peeling, pre-wash waiting and test application for its own DTF labels. Apply those instructions only to the product and conditions they cover. ↩ ↩
-
Federal Trade Commission, “Threading Your Way Through the Labeling Requirements Under the Textile and Wool Acts,” https://www.ftc.gov/business-guidance/resources/threading-your-way-through-labeling-requirements-under-textile-wool-acts. Guidance on applicable textile-label information, placement and business identification requirements. ↩
-
OEKO-TEX®, “OEKO-TEX STANDARD 100,” https://www.oeko-tex.com/en/our-standards/oeko-tex-standard-100; Global Standard gGmbH, “Approved Chemical Inputs,” https://global-standard.org/find-suppliers-shops-and-inputs/approved-chemical-inputs. These are separate schemes and evidence routes. Check the relevant certificate, input approval, product scope and applicable requirements with the supplier or certification body. ↩ ↩
-
Federal Trade Commission, “Care Labeling of Textile Wearing Apparel and Certain Piece Goods,” 16 CFR Part 423, https://www.ftc.gov/legal-library/browse/rules/care-labeling-textile-wearing-apparel-certain-piece-goods-text. Section 423.1 defines a care label in terms of continued attachment and legibility during the product’s useful life. ↩
Discussion & questions 0 comments