
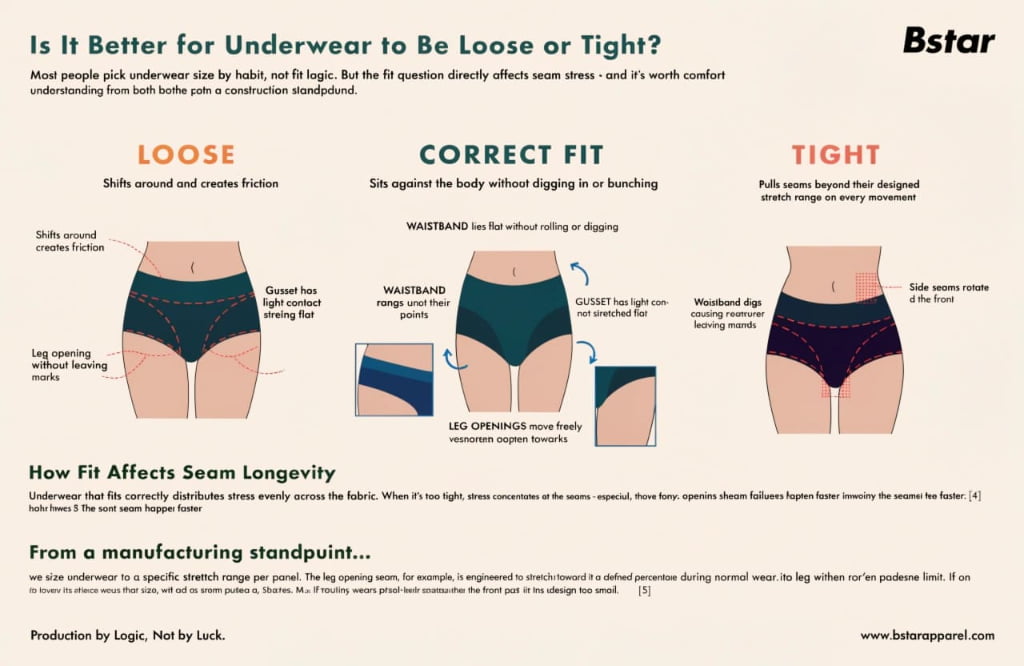
Why Do Underwear Seams Break When Stretched?
You buy a fabric sample, it feels great, the stretch is perfect — then the first production run lands and customers are sending back pairs with split seams. That calls for a construction review, not an immediate verdict on the fabric or the stitch. It’s a problem worth resolving on the sewn sample before production is approved.
Underwear seams can break when the sewn join cannot accommodate the extension and load placed on it. Stitch formation, thread, tension, stitch density, seam dimensions, needle damage and fit can all matter.1 First identify what failed: the sewing thread, the stitch formation, or the fabric beside the seam. A comfortable fabric and a familiar stitch name do not establish the performance of the finished join.
Schematic illustration, not a tested specimen. The graphic’s simple correct/incorrect labels are not universal stitch-selection rules. Thread, stitch formation, balance, seam geometry and fabric must be reviewed together.
Most buyers focus heavily on fabric composition and GSM when reviewing samples. Both matter. But approving a fabric without specifying the stitch type is like approving a car engine without specifying the transmission. The power is there — but it won’t translate correctly.
Let’s break down exactly why this happens, and what you can actually do about it before production starts. The BSTAR Underwear Lab connects this seam review with the wider sample-testing plan.
Why Does Stitch Type Control Seam Strength Under Stretch?
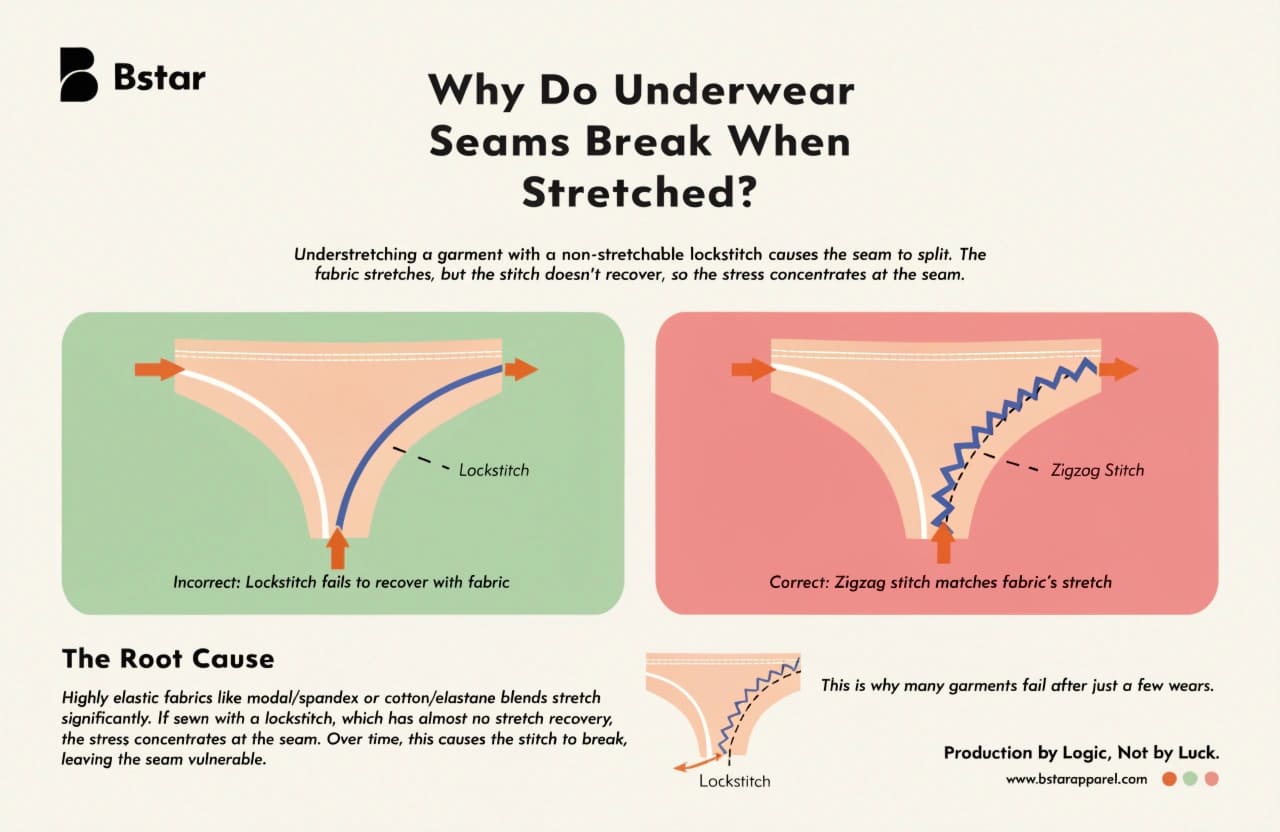
Fabric extension, seam extension and recovery are related measurements, but they are not interchangeable. A fabric-only stretch check cannot tell you how the sewn join will behave.
A high-stretch fabric doesn’t guarantee a high-stretch seam. The full combination matters: the stitch and seam construction, the amount and type of thread in the join, its balance and the base fabric. Review that combination against the movement the style needs to allow.
Illustrative comparison only. The written table below replaces the graphic’s simplified rankings and ambiguous stitch labels. Actual seam performance depends on the specified sewn combination.
Stitch Families Worth Specifying for Underwear
Here’s a plain-language breakdown to discuss with the factory. These are starting points for specification, not a ranking that approves a seam by its name alone.12
| Stitch Family | Extension Consideration | Uses to Discuss for the Style | Checks Before Approval |
|---|---|---|---|
| Lockstitch | A straight 301 stitch generally has limited elongation; zigzag lockstitch is a different formation | Labels, details and joins suited to the selected stitch and required movement | Exact stitch, thread, balance and extension requirement |
| Chainstitch | Extension depends on the formation and thread available in the seam | Panel joins or other operations where the specific construction is suitable | Stitch balance, seam security and response to repeated movement |
| Overedge / overlock | Common in stretch-knit joining and edge finishing | Knitted panel joins and edges, where compatible with the brief | Seam width, coverage, needle damage, bulk and extension |
| Coverstitch | Can provide extension with the right setup | Hems, bindings and some elastic attachments | Thread balance, needle spacing, attachment and contact profile |
| Flatseam / flatlock | Can provide a low-profile, extensible join | Low-bulk joins where the specified construction and equipment are suitable | Exact stitch and seam construction; fit, extension and recovery on the sample |
“Flatlock” is not a complete specification. For example, Coats distinguishes twin-needle coverseam 406 from flatseam 607.2 If a commercial label is unclear, ask for the stitch reference, seam cross-section or a clear sample photograph.
The complaint pattern we’ve seen goes like this: a buyer approves a fabric sample with a nice modal/spandex hand feel. The tech pack only specifies GSM and fabric composition. The factory defaults to a lockstitch or basic chainstitch because that’s what runs fastest on the line. The first bulk order ships. The seams break within a week of wear — specifically at the leg openings or gusset. Those were the reported failure locations in these projects, rather than proof that every style fails there first.
That complaint pattern gives us a reason to investigate the sewn join. It does not identify the cause by itself. A&E separates thread failure from fabric failure in its seam-defect guidance.3
| What You Observe | What to Record | What to Review Next |
|---|---|---|
| Broken sewing threads, with nearby fabric still intact | Break location, stitch line and when it appeared | Thread suitability, stitch balance, seam construction and required extension |
| A join opening while threads remain connected | Direction and extent of opening; appearance after release | Stitch balance and seam geometry against the agreed requirement |
| Holes or torn fabric alongside an intact stitch line | Fabric damage, needle line and affected panel | Needle/fabric compatibility, seam dimensions, damage and fit |
Use the observations to select the next check. Do not turn a possible cause into a confirmed diagnosis until the comparison supports it.
Why Lab Pull Tests Don’t Always Catch This
ISO 13935-2:2026 describes a grab test that applies force perpendicular to a straight sewn seam. Its scope concerns woven fabrics and allows possible application to other fabric constructions; it does not automatically qualify every curved, knitted underwear seam.4 Ask the laboratory to confirm method and specimen suitability for the actual material and construction. A breaking-force result also answers a different question from repeated extension, recovery or garment fit.
We’ve seen samples pass flat-panel pull tests and still generate seam-break complaints in the field. A passing result covered the stated specimen and test conditions, not every movement in use. Choose the construction during development, then confirm the sewn sample under the agreed fit, movement and care conditions before bulk approval.
The Buyer’s Actual Job Here
You don’t need to become a stitching expert. You need a written request that makes the construction and its review traceable:
"Please identify the stitch type and seam construction for each stretch-panel join, including leg openings, gusset and side seams. Confirm the thread, seam dimensions, required extension or load, sample-check procedure and acceptance criteria before bulk sewing."
That request puts the decision on record. The Manufacturing Guide’s fit and construction section places it alongside pattern, pouch and edge decisions. Stitch density also belongs in the specification; it should be selected for the actual combination, rather than increased without checking the fabric.5
How to Record the Sample Check and Retest
Keep the method simple enough to repeat and detailed enough for another person to review:
- Identify the sample and join. Record the style, size, version, fabric reference, color, stitch and seam construction, thread and panel location.
- Photograph the starting condition. Show the inside and outside of the same area, including any skipped stitches, marks, holes or unevenness already present.
- Define the exposure. State the direction, starting measurement and required extension or load, together with repetitions, hold and recovery conditions. A hand check and an instrumented force test should be named separately.
- Observe during and after release. Record broken thread, opening, fabric damage, permanent change or surface discomfort. Note whether the issue appears immediately, after repeated movement or after washing.
- Keep the comparison controlled. Use identified specimens and the agreed conditions. Record exactly which thread, setting, seam dimension or pattern feature changed; if several changed together, say so.
- Retest and make the decision. Compare the revised sample with the original evidence and the written requirement. Record pass, revise or further investigation, with the reviewer and sample version.
Put that record into the Sampling & Prototyping review before approving the production reference. Where a formal test is required, use the agreed laboratory method and report; do not relabel an informal pull check as a standardized result.
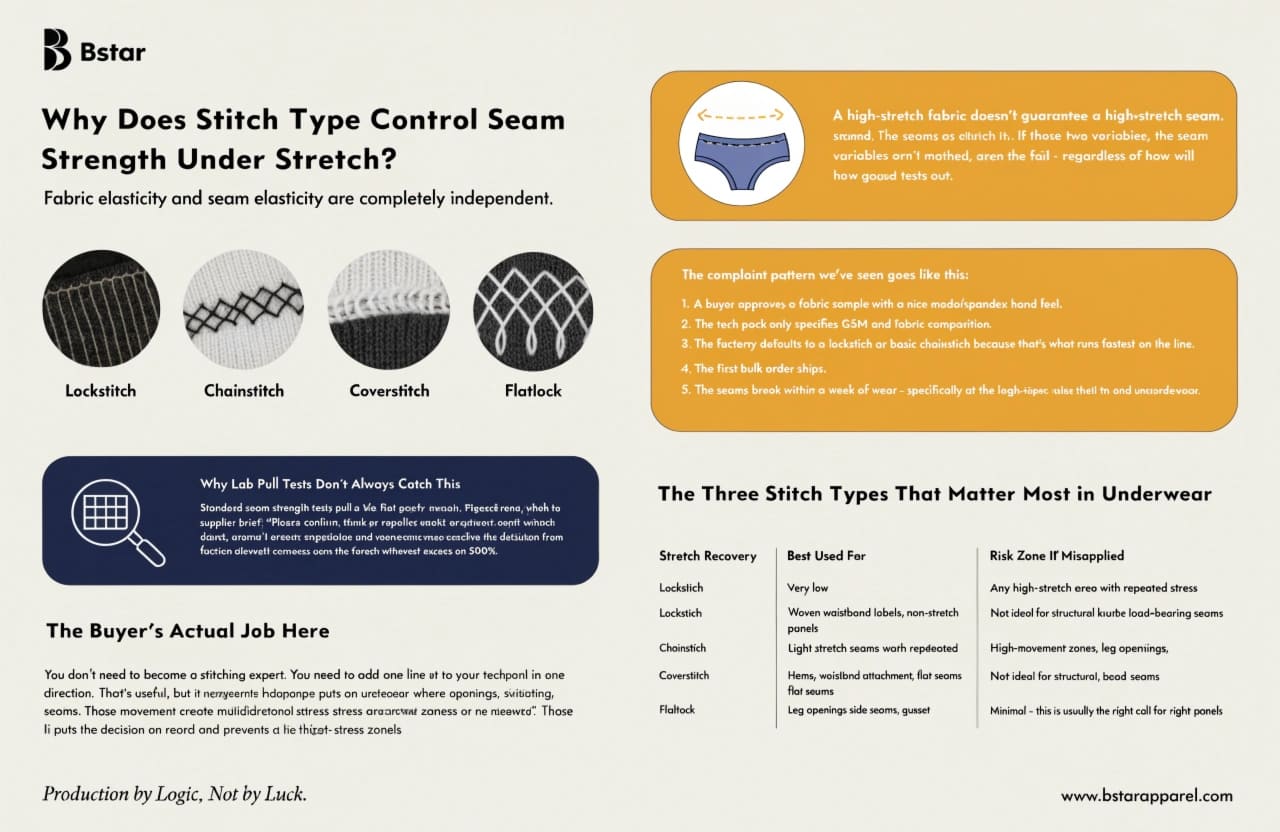
Is It Better for Underwear to Be Loose or Tight?
For a brand, the useful question is whether the fit matches the intended wearer, coverage and movement. A seam cannot be assessed independently of the garment it sits in.
The intended fit should provide the agreed support without unwanted restriction, bunching or displacement. NMSU’s construction guidance calls for adequate ease and freedom from strain, as well as appropriate stitch length and tension.6 For custom men’s underwear, confirm that on the actual sample and target size range.
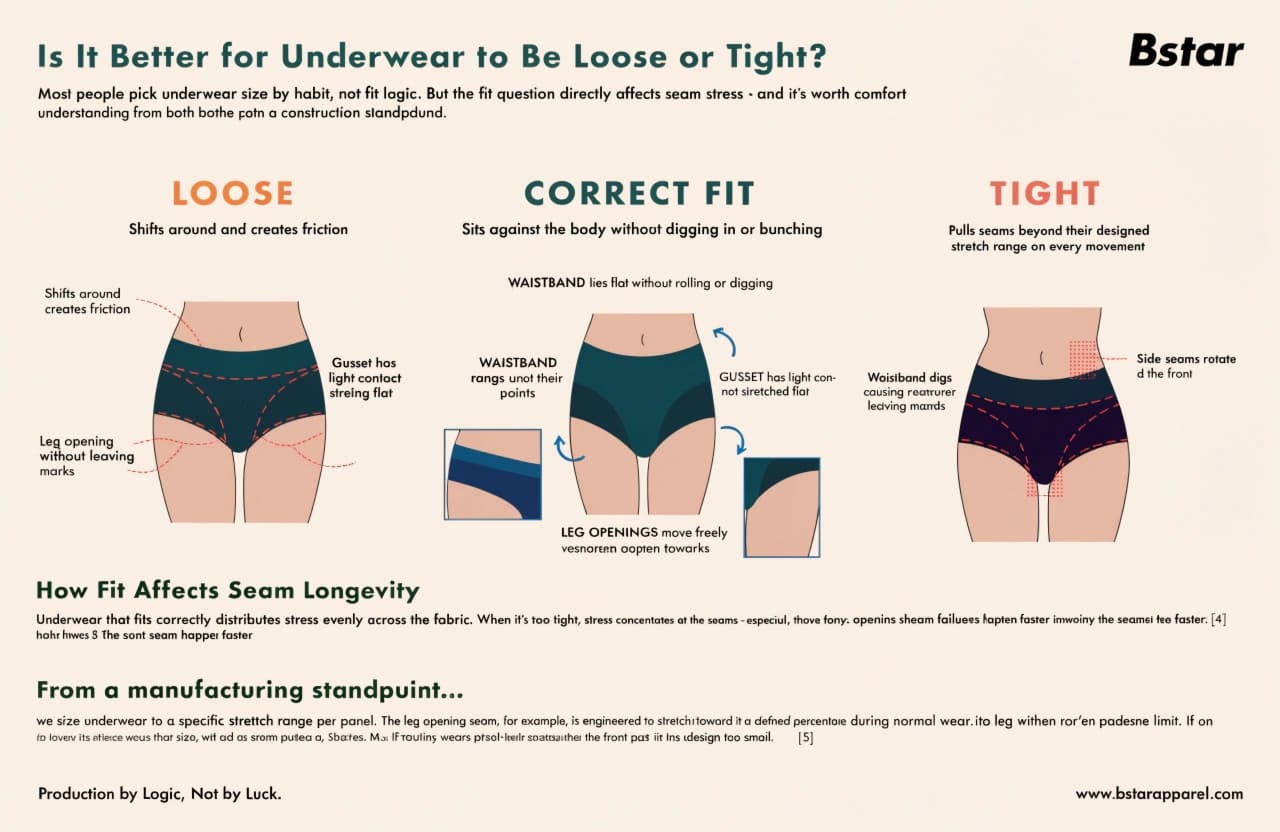
Fit illustration only. Body shape, pattern, size and style affect the intended fit; the drawing does not establish a universal seam-extension limit.
How Fit Affects Seam Longevity
An excessively restrictive fit can add demand at a join, while excess looseness can change how a panel moves. Note where the garment feels restrictive or shifts unexpectedly, then compare those areas with the seam evidence.
From a manufacturing standpoint, we review the intended extension of the panels and joins, including the leg opening. The needed movement depends on the design, size and wearer. A size label alone cannot tell us whether a seam has exceeded its agreed range; that needs a sample check.
Key fit principles:
- The waistband should lie flat without rolling or digging
- Check side-seam position against the intended pattern; unexpected rotation is a review point
- Review gusset coverage, layering and contact against the product brief
- Check leg-opening movement, pressure and recovery on the intended fit
For brands developing sizing, we’d recommend reviewing construction across the size range as well as grading the pattern. Use the sample result to decide which joins need a closer review at other sizes.
How Should Repeated Wear and Washing Be Reviewed?
A seam that looks fine when new can still need review after the intended movement and care route. Record when the change appears, rather than reporting only that the garment “didn’t last.”
Keep the wash and drying conditions consistent between comparisons. The underwear wash test checklist covers the wider garment record; here the focus is the same identified seam before and after treatment.
What This Means for Fabric Selection
Compare the actual fabric, inner layer and sewn join. A fibre name or organic-material claim cannot establish moisture transport, seam durability or how long the finished product can be worn between washes.
We’ve worked with DTC brands building "4-day underwear" claims into their marketing. The construction specs discussed for those projects included:
- Moisture-wicking inner layer
- Flatlock seams, reviewed for their actual profile and contact comfort
- Gusset construction, considered alongside coverage, layering and airflow
Those construction details do not establish a four-day wear guarantee. For a travel or performance brief, evaluate durability, moisture handling and freshness separately, and confirm which evidence supports each proposed claim.
What Should Brands Check in Sleep and Lounge Underwear?
For brands making sleepwear or lounge underwear, the construction brief should state the intended contact, coverage and movement. Write those needs into the sample brief and compare the finished garment against them.
The Fabric Angle
Consumers looking for lounge products may prioritize:
- Lightweight or breathable knits, evaluated as finished fabrics rather than assumed from a fibre name
- No-dig waistbands, assessed for the intended size and contact
- Low-profile seams, checked for bulk, roughness and movement on the actual garment
Flatseam, overedge, coverstitch or a suitable seamless construction may each have a role, depending on the product. Select and approve the actual construction rather than assuming one label eliminates every friction point.
If certification is required, verify the document holder, article or material, scope and validity for that order. Keep the supporting documents and the sample’s construction approval together, with the scope of each record clear.
How Does Fly Opening Construction Affect Seam Review?
The useful product-development question is whether your intended customer needs a functional fly, and how its construction behaves on the sample. Decide the access, overlap and coverage requirements, then review the joins that create them.
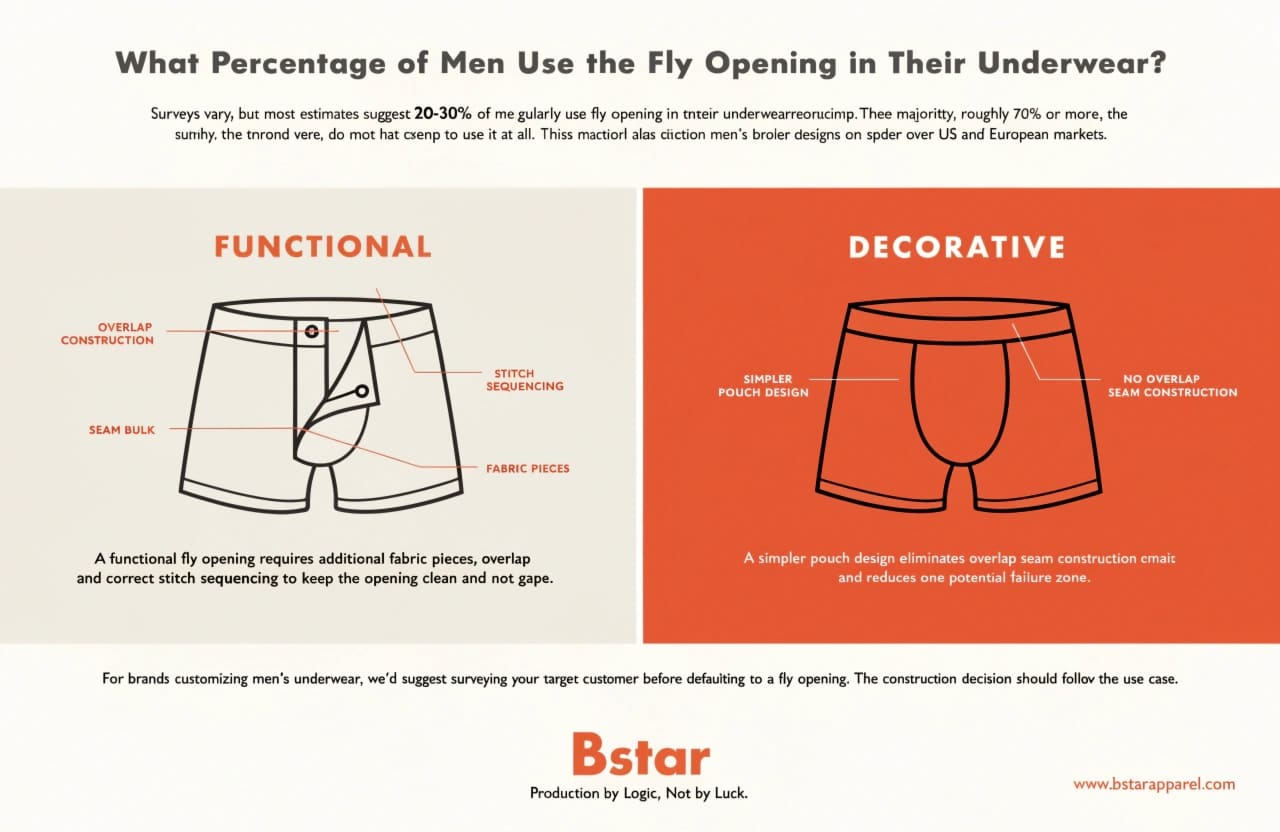
Fly-construction illustration only. The percentages printed in the graphic are not verified population data and are not used in this guide. Base the design decision on target-customer research and sample review.
What This Means for Product Development
A functional fly can require:
- Additional fabric pieces
- Overlap construction, with bulk to review
- Stitch sequencing and security to keep the opening clean without unwanted gaping
A flyless pouch changes those details, but still needs review of coverage, seam position, fit and extension. Removing an opening is not proof that the remaining joins will be more durable.
For brands customizing men’s underwear, we’d suggest surveying your target customer before defaulting to a fly opening. The construction decision should follow the use case.
How Should Gusset Seams Be Specified?
For brands targeting women’s underwear as well as men’s styles, the gusset is a material and construction decision. Identify the layers, their attachment and the intended care route, then inspect the sewn area on the actual garment.
The Underwear Construction Connection
A useful gusset brief should:
- Identify the inner layer’s composition, surface and intended function
- Describe the edge finish, attachment and coverage appropriate to the style
- State the stitch and seam construction, dimensions and relevant extension requirement
- Include checks for bulk, roughness, loose or damaged stitches and change after washing
We see a lot of value-end underwear where the gusset is attached with a basic serged edge. In those examples, the cost-saving decision was noticeable in wear comfort. That does not make every overlocked gusset unsuitable: compare the actual edge, layer arrangement and contact profile before deciding what to change.
Keep the appearance, comfort observation and mechanical result as separate entries in the sample record. Specify what should stay consistent after movement and washing, then record whether the revised gusset meets that requirement.
Frequently Asked Questions
How do I specify stitch type in a tech pack without being a stitching expert?
Ask for the stitch reference or a clear construction description for each relevant panel join, along with the thread, seam dimensions and intended movement. Confirm the sample-check procedure and acceptance criteria in writing. A photograph or seam diagram can help make the terms unambiguous.
Can thread quality fix a seam that breaks under stretch?
Thread selection can be part of the solution, but it is not the whole diagnosis. Review the break location, thread suitability and size, stitch balance and construction together.7 Coats notes that even stitch formation affects extension: a straight lockstitch and a zigzag lockstitch should not be treated as the same setup.2 Retest the revised combination.
Do certifications like OEKO-TEX® or GOTS guarantee seam quality?
No. OEKO-TEX® STANDARD 100 concerns harmful-substance testing, while GOTS addresses organic textiles and processing under its own requirements.8 Check the actual document and scope. Those documents do not replace the style’s agreed seam, extension and fit review or prove performance under every care and wear condition.
How do I know if a manufacturer is defaulting to the wrong stitch on stretch panels?
Ask for a stitch breakdown by panel in the tech pack feedback. If a factory can’t tell you which stitch method they plan to use on each seam zone before sampling, that’s a gap in their process — and a flag worth addressing before bulk production.
What’s the most failure-prone seam zone in underwear?
The leg openings and gusset attachments were prominent in the complaints described above. For another style, prioritize the joins identified by its fit, movement, construction and previous evidence. Include waistband joins, pouch seams or seam intersections where relevant; there is no universal first-failure location.
Conclusion
Underwear seam breakage under stretch needs a review of the sewn combination. Identify whether the thread, stitch formation or base fabric failed before choosing a correction. We’ve seen this pattern repeat across orders where buyers approved excellent fabrics but left stitch selection to the factory floor — and paid for it in returns and complaints.
The core takeaway: fabric spec and stitch spec need to be approved together. Record the actual construction, required movement, test conditions and acceptance criteria, then confirm the revised sample before transferring that specification to bulk sewing.
Add this to your tech pack today: "Confirm stitch and seam construction for the identified panels, the required extension or load, and the sample review and acceptance criteria. Record changes and retest the approved production-intent combination before bulk sewing."
If you’re developing custom underwear, contact the BSTAR team with your fabric reference, garment size, seam photographs and the movement or care condition that revealed the issue. We can review the sample scope and the construction details that need confirmation before the next production decision.
-
American & Efird, “Sewing Stretch Knit Fabrics,” technical bulletin, https://www.amefird.com/wp-content/uploads/2010/01/Sewing-Stretch-Kni-tFabrics-2-6-10.pdf. Supplier guidance on seam elasticity and construction variables for stretch knits; its example settings are not a specification for every underwear style. ↩ ↩
-
Coats, “Basic Stitch Types,” https://www.coats.com/en-us/info-hub/Basic-stitch-types/. Describes straight and zigzag lockstitch, chainstitch, overedge, coverseam and flatseam formations, including distinctions between stitch types 406 and 607. ↩ ↩ ↩
-
American & Efird (2002), “Common Seam Quality Defects,” https://www.amefird.com/wp-content/uploads/2010/01/seam_quality_defects.pdf. Technical illustrations distinguish stitch/thread failures from fabric failures and identify items for investigation; they do not diagnose a new sample without inspection. ↩
-
International Organization for Standardization, “ISO 13935-2:2026 — Textiles — Seam tensile properties of fabrics and made-up textile articles — Part 2: Determination of maximum force to seam rupture using the grab method,” https://www.iso.org/standard/88344.html. Official scope information; method suitability for the actual knitted fabric, seam and specimen must be agreed with the laboratory. Confirm the method edition in the project test plan. ↩
-
American & Efird, “Stitches Per Inch (SPI) — What You Should Know,” https://www.amefird.com/wp-content/uploads/2010/01/Selecting-the-right-SPI-2-5-10.pdf. Discusses stitch density, appearance, seam performance and fabric damage. Example ranges and woven-seam calculations are not blanket specifications for stretch underwear. ↩
-
New Mexico State University, “Clothing Construction Standards,” Guide C-214, revised by Wendy Hamilton, https://pubs.nmsu.edu/_c/C214/index.html. General guidance on fit, seam finish and stitching, used here for sample-review principles. ↩
-
Coats, “FAQ — Apparel,” https://www.coats.com/en/industries/apparel/faqs/. Manufacturer guidance on thread, stitch formation, seam opening, tension and related sewing issues. Apply recommendations to the relevant construction and verify changes on the sample. ↩
-
OEKO-TEX®, “OEKO-TEX STANDARD 100,” https://www.oeko-tex.com/en/our-standards/oeko-tex-standard-100; Global Standards gGmbH, “Global Organic Textile Standard (GOTS),” https://global-standards.org/our-standards/gots. These schemes have different requirements and scopes. Certification documents must be checked for the actual material or product and do not replace a project-specific seam-performance approval. ↩
Discussion & questions 0 comments